
Decoding Human Emotions: The Power of AI in Facial Emotion Detection
This project demonstrates custom facial emotion detection using a YOLO model trained on image datasets collected from various sources. Leveraging TensorFlow, OpenCV, and Python, the model accurately classifies emotions across multiple categories.
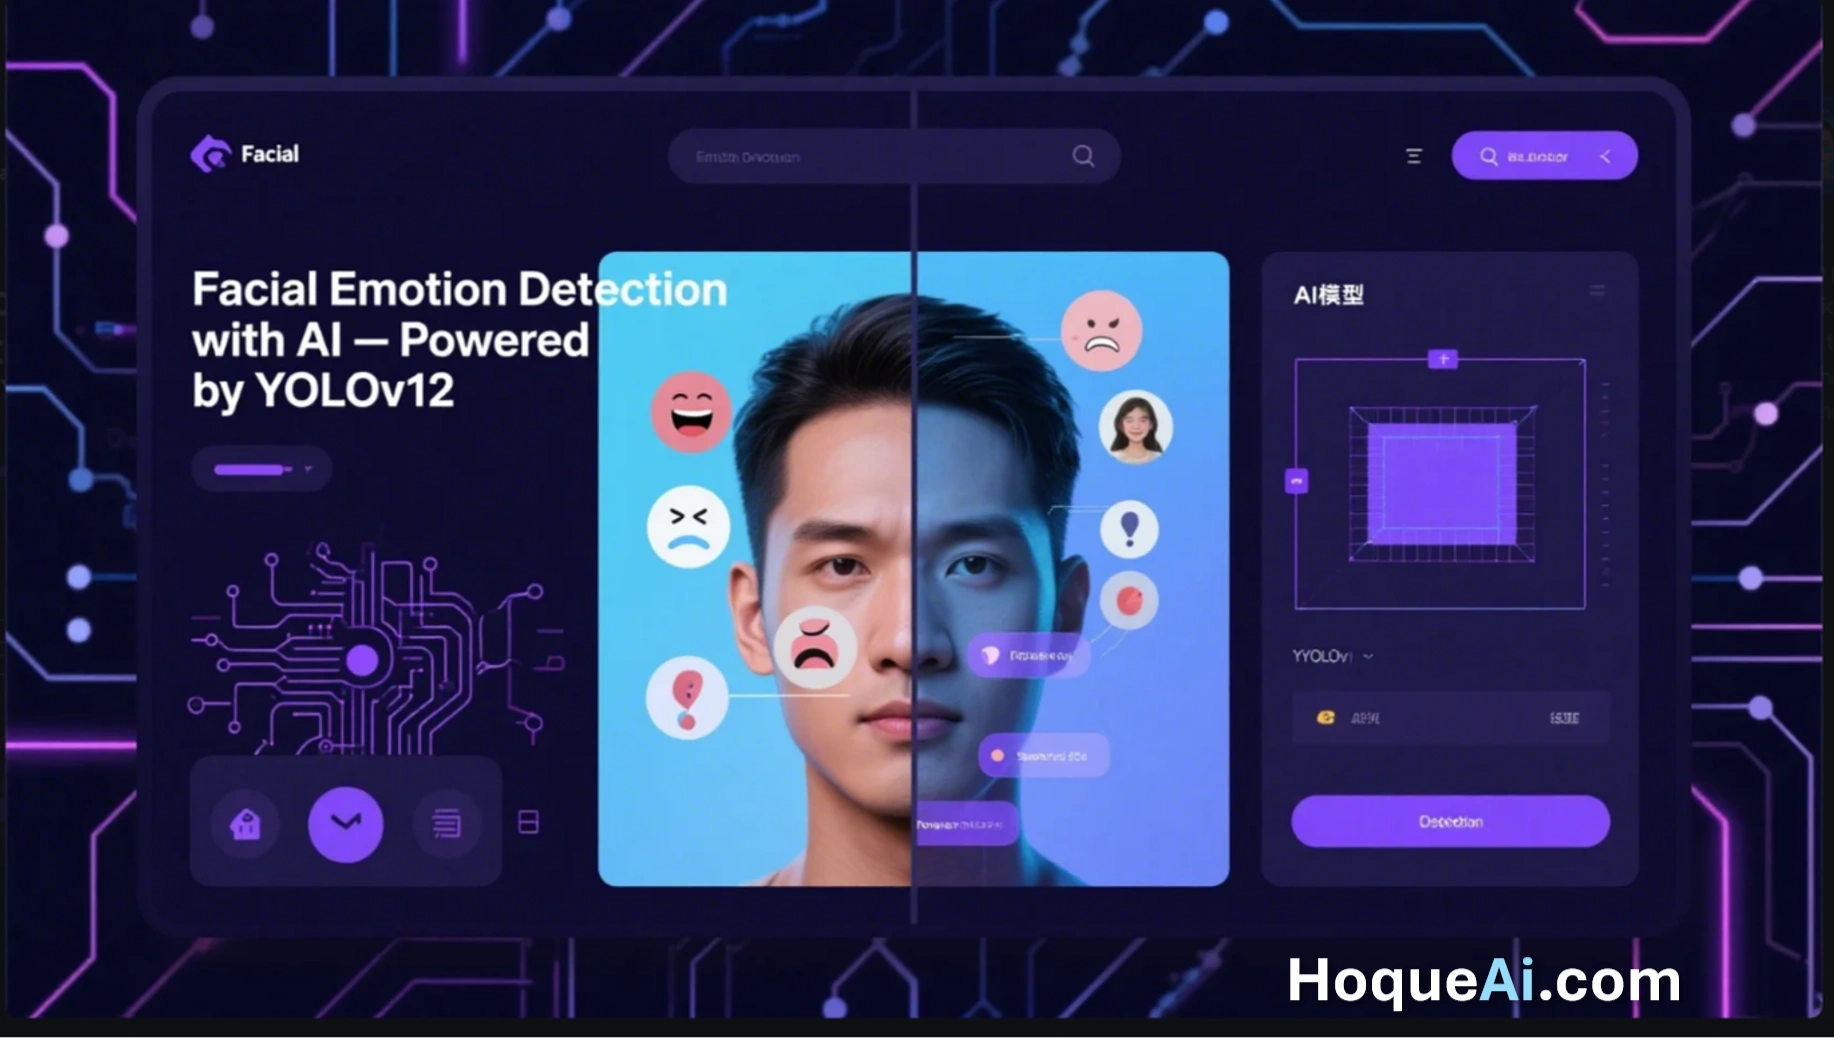
AI Generated image: The Power of AI in Facial Emotion Detection
Facial emotion detection is an innovative application of artificial intelligence and computer vision
that interprets human emotions by analyzing facial expressions. It involves using deep learning
algorithms to recognize and classify emotions such as Angry,
Disgust, Fear, Happy, Neutral,
Sad, and Surprise from facial images or videos.
This technology has revolutionized sectors such as customer service, healthcare, marketing, and security by providing valuable insights into human behavior. By identifying emotional states in real-time, businesses can enhance user experiences, offer personalized interactions, and monitor well-being.
Advances in convolutional neural networks (CNNs) and deep learning frameworks like TensorFlow and PyTorch have significantly improved the accuracy and reliability of facial emotion detection systems. As these technologies continue to evolve, they contribute to the growing capabilities of AI in understanding and responding to human emotions.
Facial emotion detection is a remarkable application of artificial intelligence (AI) that leverages computer vision and deep learning algorithms to interpret human emotions from facial expressions. Understanding how these systems work requires exploring both the psychological foundation of facial expressions and the technological advancements in AI.
Facial expressions are a universal language of human emotions, conveyed through intricate movements of facial muscles. According to the research by psychologist Paul Ekman, there are seven universally recognized facial expressions:
These expressions provide critical cues that AI models analyze to determine emotional states.
AI models interpret facial expressions through a series of systematic processes. The key steps include:
The system uses algorithms like YOLOv12 (You Only Look Once) to detect and extract faces from images or video frames.
Once a face is detected, AI algorithms analyze key facial landmarks like the eyes, eyebrows, nose, and mouth using techniques such as:
With the extracted facial features, the AI model applies a pre-trained neural network to classify the expression into one of the seven categories. Models like YOLOv12 and EfficientNet are often fine-tuned for this purpose.
Here is a simple code example demonstrating how to load a YOLOv12 model and perform facial emotion detection:
            from ultralytics import YOLO

            # Load the pre-trained YOLO model
            model = YOLO('yolov12.pt')

            # Perform detection on an image
            results = model('path_to_image.jpg')

            # Display results
            results.show()
By understanding both the science and technology behind emotion detection, we can better appreciate how AI is transforming human-computer interactions and advancing applications in fields like mental health, customer service, and security monitoring.
Facial emotion detection is revolutionizing how humans interact with machines. By analyzing facial expressions, AI models can interpret human emotions, enhancing user experience and creating personalized interactions. This technology is making significant strides in various fields, offering improved services and smarter systems.
Emotion detection aids in mental health monitoring by recognizing signs of depression, anxiety, or stress. Therapists can use this technology to gather insights into a patient’s emotional well-being during virtual sessions.
Businesses use AI-driven emotion analysis to assess customer satisfaction. Call centers and chatbots equipped with emotion detection can respond empathetically, providing more effective support.
In e-learning environments, emotion detection helps educators gauge student engagement and understanding. By identifying confusion or boredom, educators can adjust lessons for better comprehension.
Brands analyze customer reactions to advertisements using emotion detection. Understanding emotional responses enables marketers to create campaigns that resonate better with their target audience.
Emotion detection enhances security systems by identifying suspicious behavior through facial expressions. It’s widely used in airports and other high-security areas to monitor crowd behavior.
Emotion detection is an essential component of human-computer interaction, offering invaluable insights into human emotions. Its applications across healthcare, education, customer service, and security demonstrate its potential to transform industries. By incorporating emotion detection, companies can enhance user experiences and build smarter, more empathetic AI systems.
Facial landmarks are key points on a face that represent important anatomical locations, such as the eyes, nose, mouth, and jawline. These landmarks are used by AI systems to map facial expressions and identify emotions.
AI models utilize deep learning techniques, particularly convolutional neural networks (CNNs), to detect and localize facial landmarks. This involves:
Once the facial landmarks are detected, AI systems compare the patterns to labeled datasets of facial expressions. Key components include:
            import cv2
            import dlib

            # Load pre-trained model
            face_detector = dlib.get_frontal_face_detector()
            landmark_predictor = dlib.shape_predictor('shape_predictor_68_face_landmarks.dat')

            # Load image
            image = cv2.imread('face_image.jpg')
            gray = cv2.cvtColor(image, cv2.COLOR_BGR2GRAY)

            # Detect faces
            faces = face_detector(gray)
            for face in faces:
            landmarks = landmark_predictor(gray, face)
            for n in range(68):
            x, y = landmarks.part(n).x, landmarks.part(n).y
            cv2.circle(image, (x, y), 1, (0, 255, 0), -1)

            cv2.imshow('Facial Landmarks', image)
            cv2.waitKey(0)
            cv2.destroyAllWindows()
In this example, the code uses the Dlib library to detect facial landmarks and visualize them on an image.
Facial landmark detection and expression mapping play a critical role in recognizing emotions. By accurately analyzing facial movements and muscle patterns, AI systems can interpret human emotions effectively. This technology has vast applications in fields such as healthcare, automotive safety, and entertainment.
CNNs are widely used for image classification tasks. They consist of convolutional layers that extract features from images, followed by pooling and fully connected layers for classification.
A simple CNN model might include layers like:
            Conv2D(filters=64, kernel_size=(3,3), activation='relu', input_shape=(48, 48, 1))
            MaxPooling2D(pool_size=(2,2))
            Flatten()
            Dense(7, activation='softmax')
VGG models are deep CNN architectures with small 3x3 convolutional filters. They are effective for image recognition tasks and can be fine-tuned for facial emotion detection.
VGG16 pre-trained on ImageNet can be used with transfer learning:
            base_model = VGG16(weights='imagenet', include_top=False, input_shape=(48, 48, 3))
            x = Flatten()(base_model.output)
            x = Dense(7, activation='softmax')(x)
            model = Model(inputs=base_model.input, outputs=x)
ResNet uses skip connections to solve the vanishing gradient problem. It's particularly effective for deeper models and is often used for emotion recognition with complex datasets.
Using ResNet50 for facial emotion detection:
            base_model = ResNet50(weights='imagenet', include_top=False, input_shape=(48, 48, 3))
            x = GlobalAveragePooling2D()(base_model.output)
            x = Dense(7, activation='softmax')(x)
            model = Model(inputs=base_model.input, outputs=x)
| Criteria | CNN | VGG | ResNet |
|---|---|---|---|
| Model Depth | Shallow | 16-19 layers | 50-152 layers |
| Parameter Count | Few | ~138M | ~25M (ResNet-50) |
| Accuracy | Moderate | High | Very High |
| Training Time | Fast | Slower | Efficient with Residuals |
Choosing the right model depends on your dataset size, computational resources, and accuracy needs. For smaller datasets, CNNs are a practical choice, while VGG or ResNet models provide better accuracy for larger datasets.
Transfer learning involves taking a pre-trained model, often built on large datasets like ImageNet, and fine-tuning it for a specific task. In emotion detection, transfer learning can significantly reduce training time and improve accuracy.
Here’s a step-by-step example of how to implement transfer learning using VGG16 in TensorFlow for facial emotion recognition.
            import numpy as np
            import tensorflow as tf
            from tensorflow import keras
            from tensorflow.keras import layers
            from tensorflow.keras.applications import VGG16
            base_model = VGG16(weights='imagenet', include_top=False, input_shape=(224, 224, 3))
            base_model.trainable = False # Freeze the convolutional base
            x = layers.Flatten()(base_model.output)
            x = layers.Dense(256, activation='relu')(x)
            x = layers.Dropout(0.5)(x)
            out = layers.Dense(7, activation='softmax')(x) # 7 classes of emotions

            model = keras.Model(inputs=base_model.input, outputs=out)
            model.compile(optimizer='adam', loss='categorical_crossentropy', metrics=['accuracy'])

            # Assuming train_data and val_data are preprocessed datasets
            model.fit(train_data, epochs=20, validation_data=val_data)
Using transfer learning with models like VGG16 or ResNet can yield highly accurate results for facial emotion detection. Experimenting with hyperparameters, data augmentation, and fine-tuning the base model can further enhance performance.
Choosing the right architecture is key for effective emotion detection. Common choices include Convolutional Neural Networks (CNNs) and Residual Networks (ResNet). These models are designed to extract complex features from images.
Using a simple CNN for emotion detection with layers like convolution, pooling, and dense layers.
            model = Sequential([
              Conv2D(64, (3,3), activation='relu', input_shape=(48,48,1)),
              MaxPooling2D(pool_size=(2,2)),
              Flatten(),
              Dense(128, activation='relu'),
              Dense(7, activation='softmax')
            ])
Hyperparameters such as learning rate, batch size, and number of epochs significantly affect model performance. Tools like GridSearchCV or Optuna can help automate the tuning process.
Using a learning rate scheduler to dynamically adjust the learning rate during training:
            def scheduler(epoch, lr):
              return lr * 0.95 if epoch % 10 == 0 else lr
Optimizers like Adam, SGD, or RMSprop are used to minimize the loss function. Regularization techniques like dropout and batch normalization prevent overfitting.
model.compile(optimizer=Adam(learning_rate=0.001), loss='categorical_crossentropy', metrics=['accuracy'])
By carefully designing the architecture, tuning hyperparameters, and applying effective optimization techniques, you can achieve high accuracy in facial emotion detection tasks. Evaluate your model using validation data and iteratively improve it for the best results.
YOLOv12 (You Only Look Once version 12) is a state-of-the-art object detection model designed for real-time applications. It excels in speed and accuracy, making it an ideal choice for facial emotion detection. By employing a single neural network to process images, YOLOv12 identifies multiple objects and their locations within milliseconds.
Facial emotion detection requires rapid and precise analysis of expressions. YOLOv12's architecture is optimized for low-latency performance, ensuring quick and reliable predictions even on devices with limited computational power.
Imagine a virtual assistant that uses a camera to monitor a user's emotional state during a conversation. Using YOLOv12, the assistant can detect facial emotions in real-time, adjusting its tone or responses accordingly. This enhances the user experience by making interactions more human-like.
With its exceptional speed, accuracy, and efficiency, YOLOv12 offers a powerful solution for facial emotion detection applications. Its ability to analyze facial expressions in real-time opens up a wide range of possibilities in healthcare, customer service, and human-computer interaction.
Google Colab is a free and easy-to-use platform that supports GPU acceleration. Follow these steps to set up your environment:
If you prefer to run the project on your local machine, follow these steps:
python --version.pip install virtualenv.virtualenv yolov12_envyolov12_env\Scripts\activatesource yolov12_env/bin/activateAfter setting up the environment, install the following libraries:
!pip install ultralytics torch torchvision numpy opencv-python
Explanation:
Verify installations using the following commands:
            import torch
            import ultralytics
            import numpy as np
            import cv2

            print("Torch version:", torch.__version__)
            print("Ultralytics version:", ultralytics.__version__)
            print("Numpy version:", np.__version__)
            print("OpenCV version:", cv2.__version__)
Once all the libraries are installed and verified, you're ready to proceed with model training and emotion detection!
Roboflow is a popular platform for creating and managing custom datasets for machine learning tasks. It offers a simple way to download datasets using API links, which can be integrated directly into your machine learning project. Here's how you can download and load a facial emotion dataset from Roboflow.
Roboflow provides an easy way to download datasets directly using the API. You need to install the roboflow Python library and then use the API to get your dataset.
First, install the roboflow library using pip if it's not already installed:
pip install roboflow
Once the Roboflow library is installed, you can use it to fetch your dataset. Here's a sample code to demonstrate how you can download the dataset:
            from roboflow import Roboflow

            # Initialize Roboflow
            rf = Roboflow(api_key="your_roboflow_api_key")  # Replace with your API key

            # Get the project and version
            project = rf.workspace().project("your_project_name")  # Replace with your project name
            dataset = project.version(1).download("yolov5")  # "yolov5" indicates YOLO format, other formats are also available

            # Verify that the dataset is downloaded
            print("Dataset downloaded to:", dataset.location)
After downloading the dataset, you can load it into your project. The dataset will typically be in a format like YOLOv5, which includes a train/, valid/, and test/ folder, containing labeled images and a .txt file for each image.
For example:
train/: Contains training imagesvalid/: Contains validation imagestest/: Contains test imagesHere’s how you can load the dataset in your project:
            import os
            import cv2
            import numpy as np

            # Define the paths
            train_path = "path/to/train/images/"
            labels_path = "path/to/train/labels/"

            # Load one of the images and its label
            image_path = os.path.join(train_path, "image1.jpg")
            label_path = os.path.join(labels_path, "image1.txt")

            # Load image
            image = cv2.imread(image_path)

            # Load label file
            with open(label_path, "r") as file:
                labels = file.readlines()

            # Print the image and label information
            print(f"Image: {image_path}, Labels: {labels}")
Once you’ve downloaded and processed the dataset, you can now use it for training your model (e.g., YOLOv5, YOLOv12, or any other model) by pointing the model to the dataset’s directory.
Here’s how you might pass the dataset to a YOLOv12 model:
            from ultralytics import YOLO

            # Load your YOLOv12 model
            model = YOLO('yolov12.yaml')

            # Train the model with the Roboflow dataset
            model.train(data="path/to/roboflow_dataset/data.yaml", epochs=30, batch=8)
The data.yaml file contains important information like the number of classes, class names, and paths to the training, validation, and test datasets.
Roboflow makes it incredibly easy to download and load custom datasets for various machine learning tasks, including facial emotion detection. By leveraging their API and proper dataset integration, you can quickly set up your models and train them with high-quality labeled data.
The brain tumor dataset, collected from the reputable Roboflow platform, serves as the foundation for training and evaluating the YOLOv12 model. This dataset is meticulously annotated and labeled to ensure accurate detection of brain tumors in medical imaging.
A well-organized directory structure is maintained for seamless model training, typically resembling:
            /dataset
            │
            ├── images
            │   ├── train
            │   ├── val
            │   └── test
            ├── labels
            │   ├── train
            │   ├── val
            │   └── test
            └── data.yaml
The dataset is systematically organized into three primary folders, each playing a crucial role in the model development process:
data.yaml file contains paths to the datasets, class names, and other configuration details
required for YOLOv12 training.With a properly prepared dataset, the YOLOv12 model can be efficiently trained to detect brain tumors, contributing to faster and more accurate diagnoses in medical imaging.
.txt files) containing class labels
and coordinates of the bounding boxes.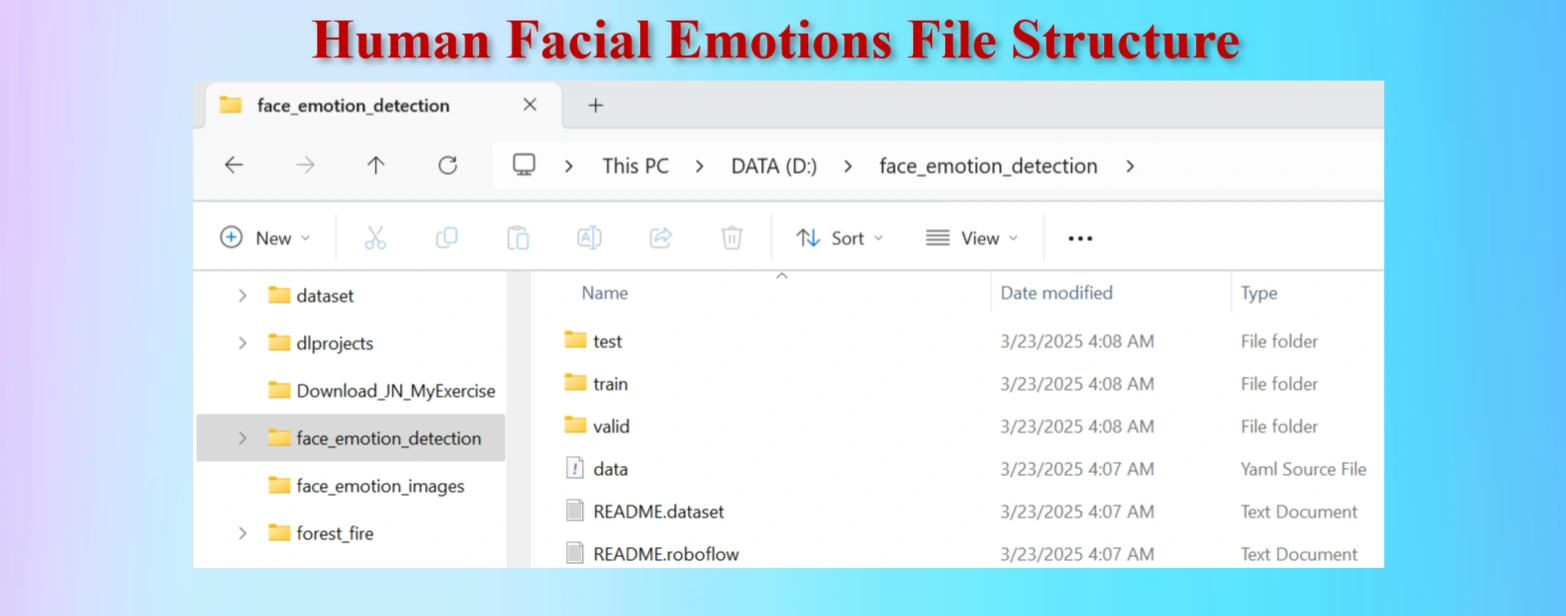
Facial emotion file structure.
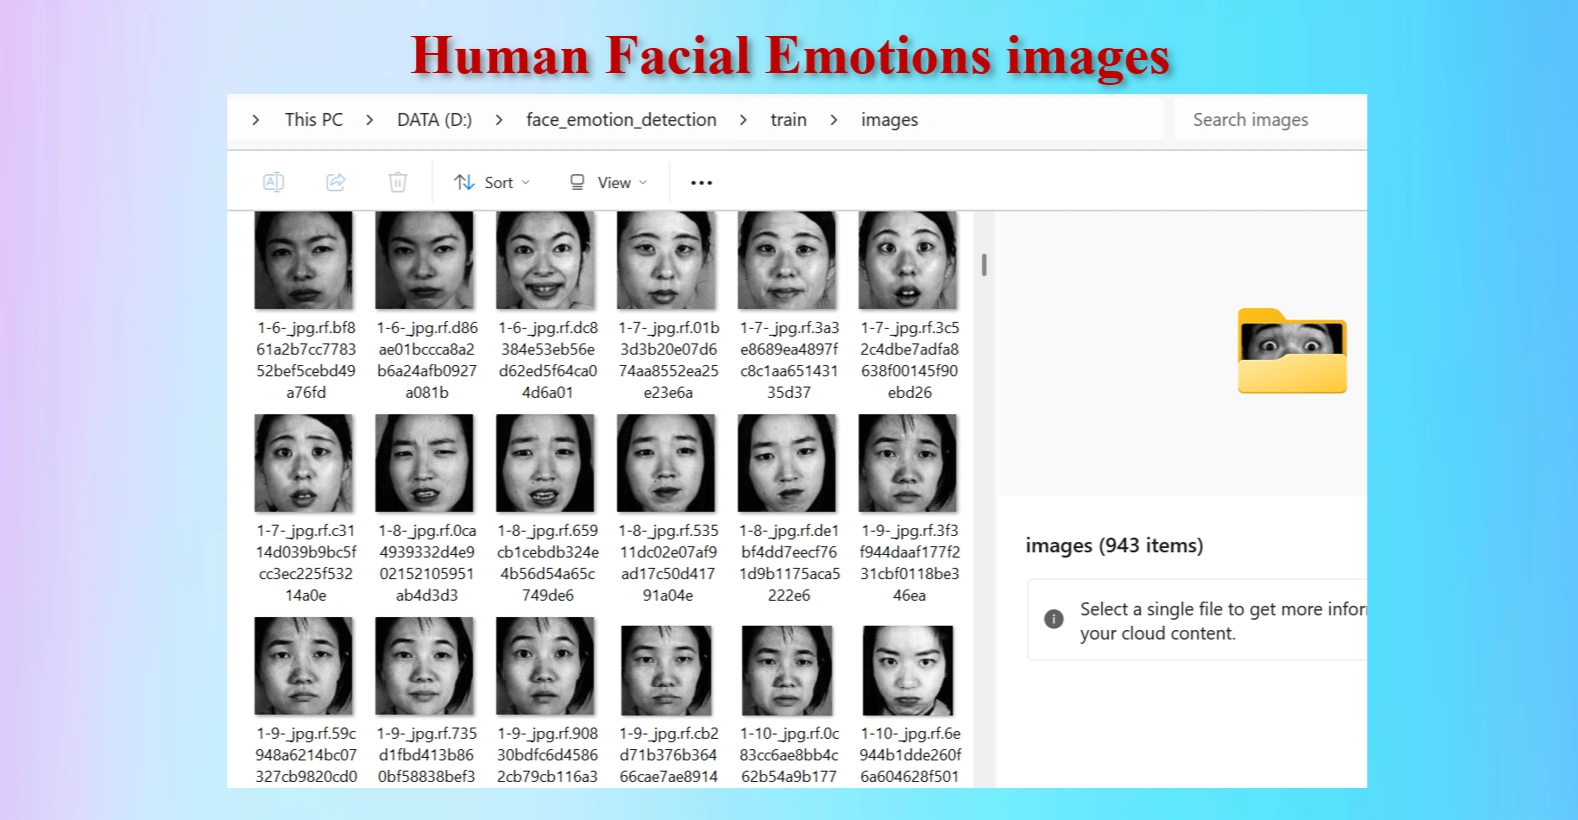
Human facial emotion images in /train/images folders.
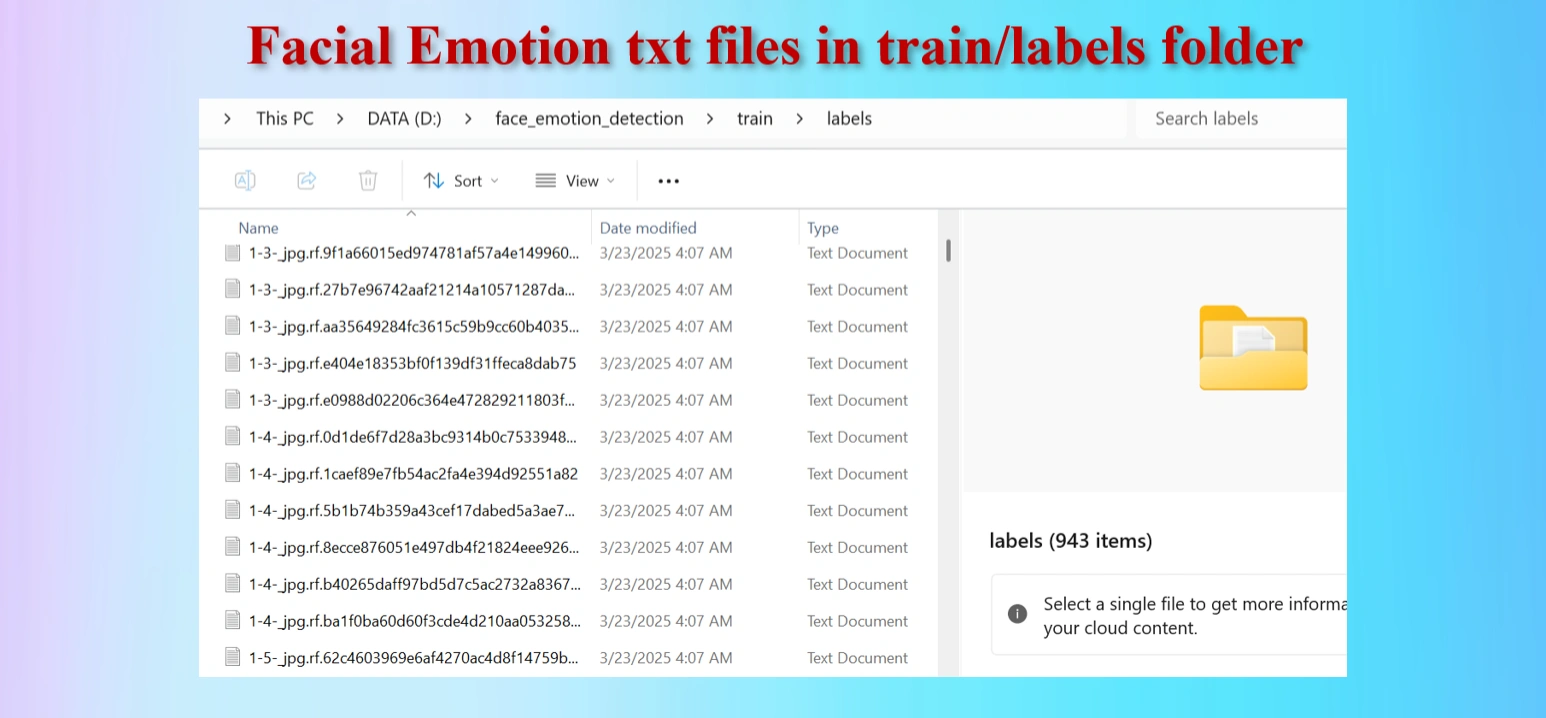
Annotated txt files for each image, with the same name of images.
The downloaded dataset contains 1,227 images and 1,227 txt files.They are distributed as:
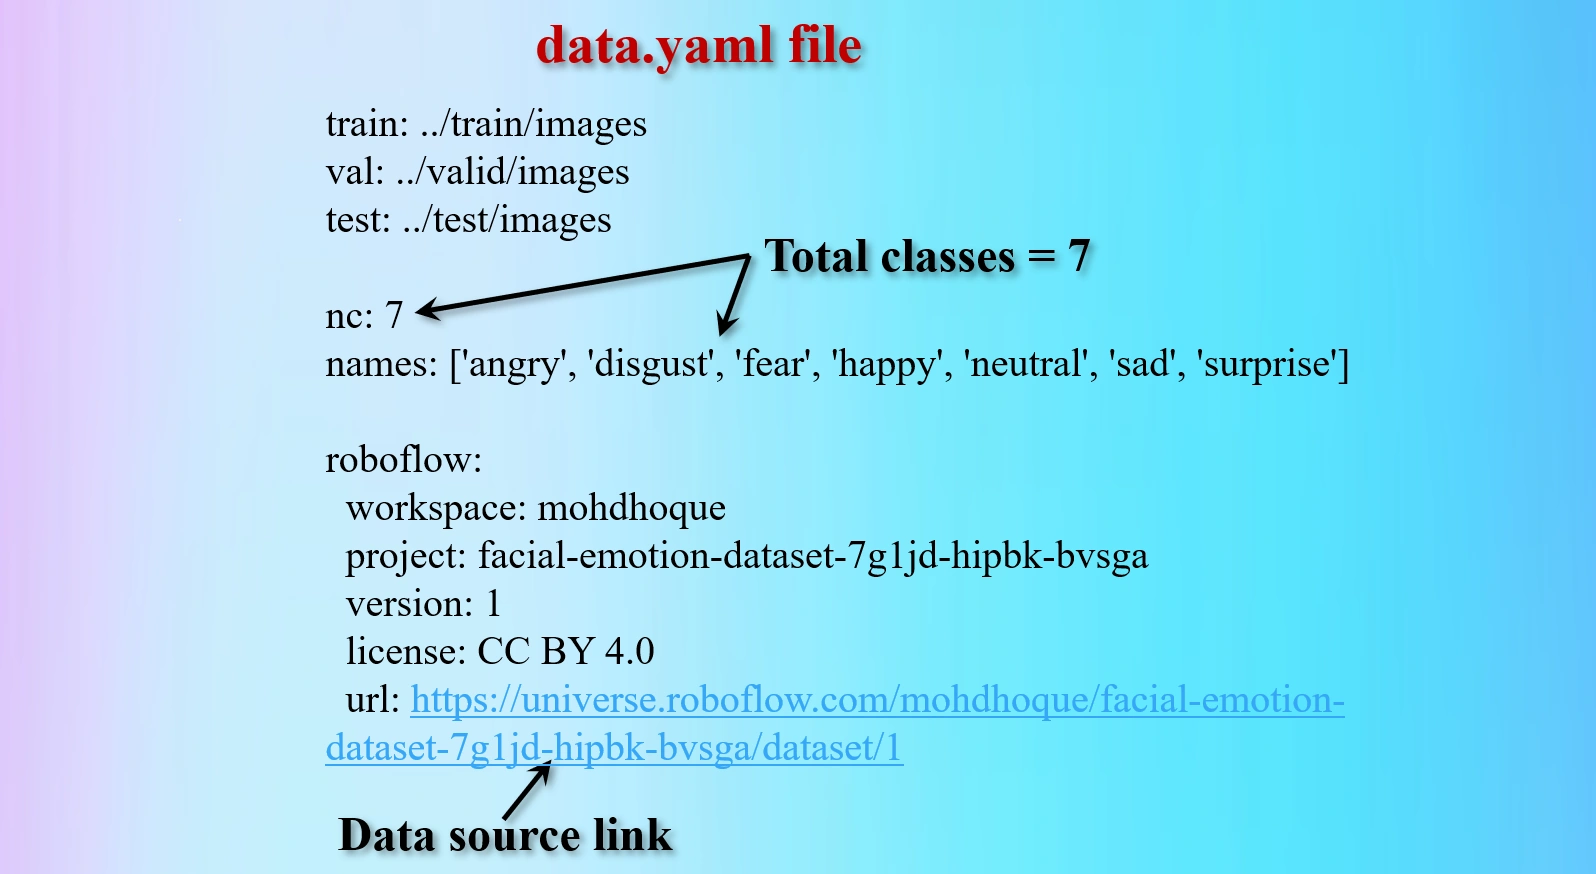
Contents of data.yaml file.
The yaml file contains 7 classes brain tumors:
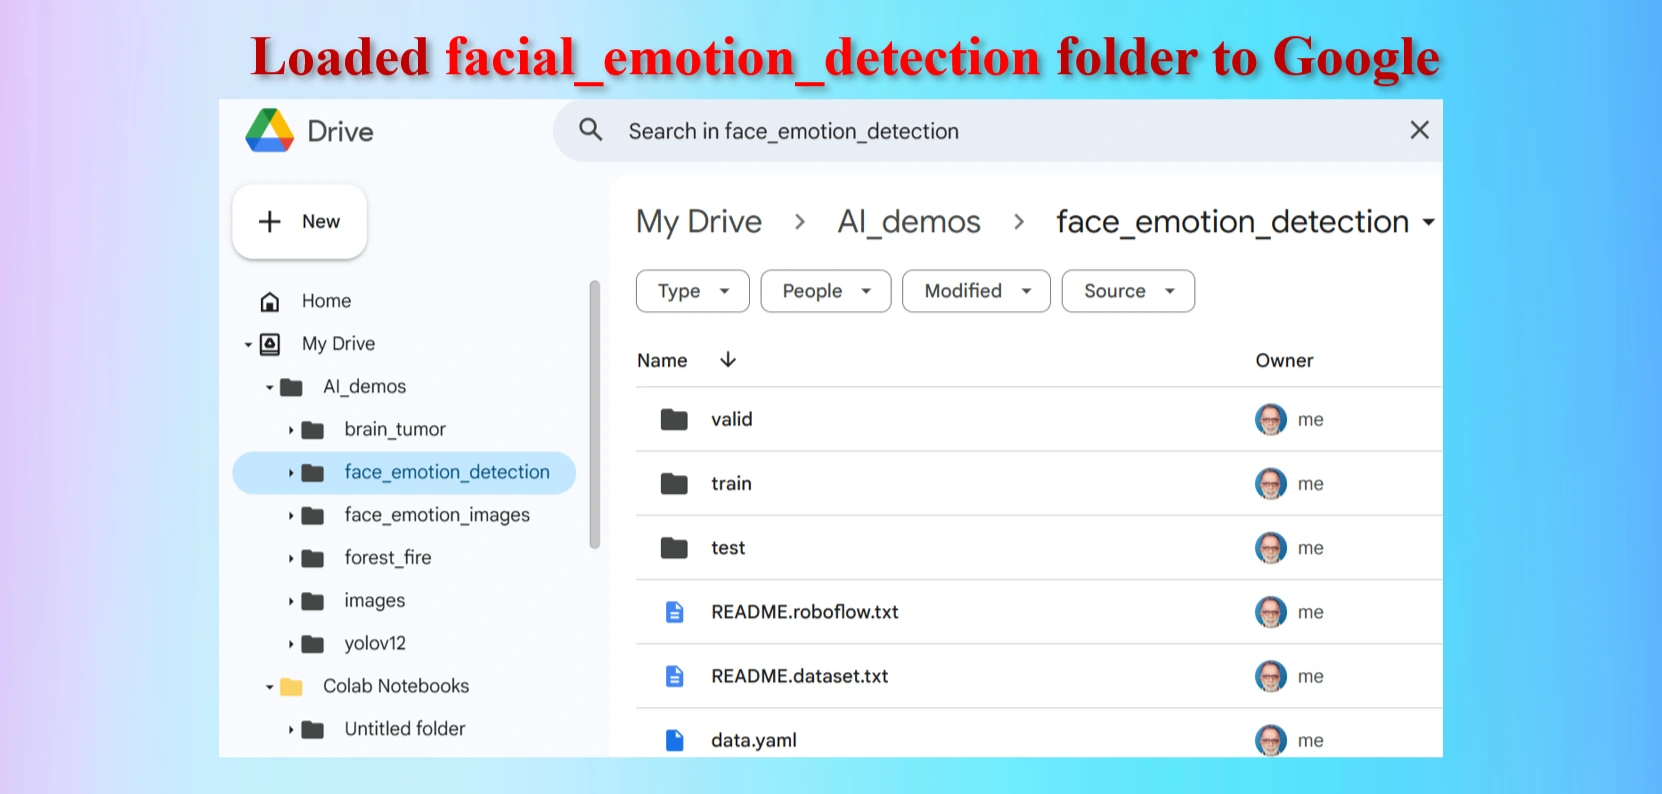
Loaded facial_emotion_detection folder to Google Drive
The uploaded facial_emotion_detection folder contains test, train and val folders including data.yaml file.
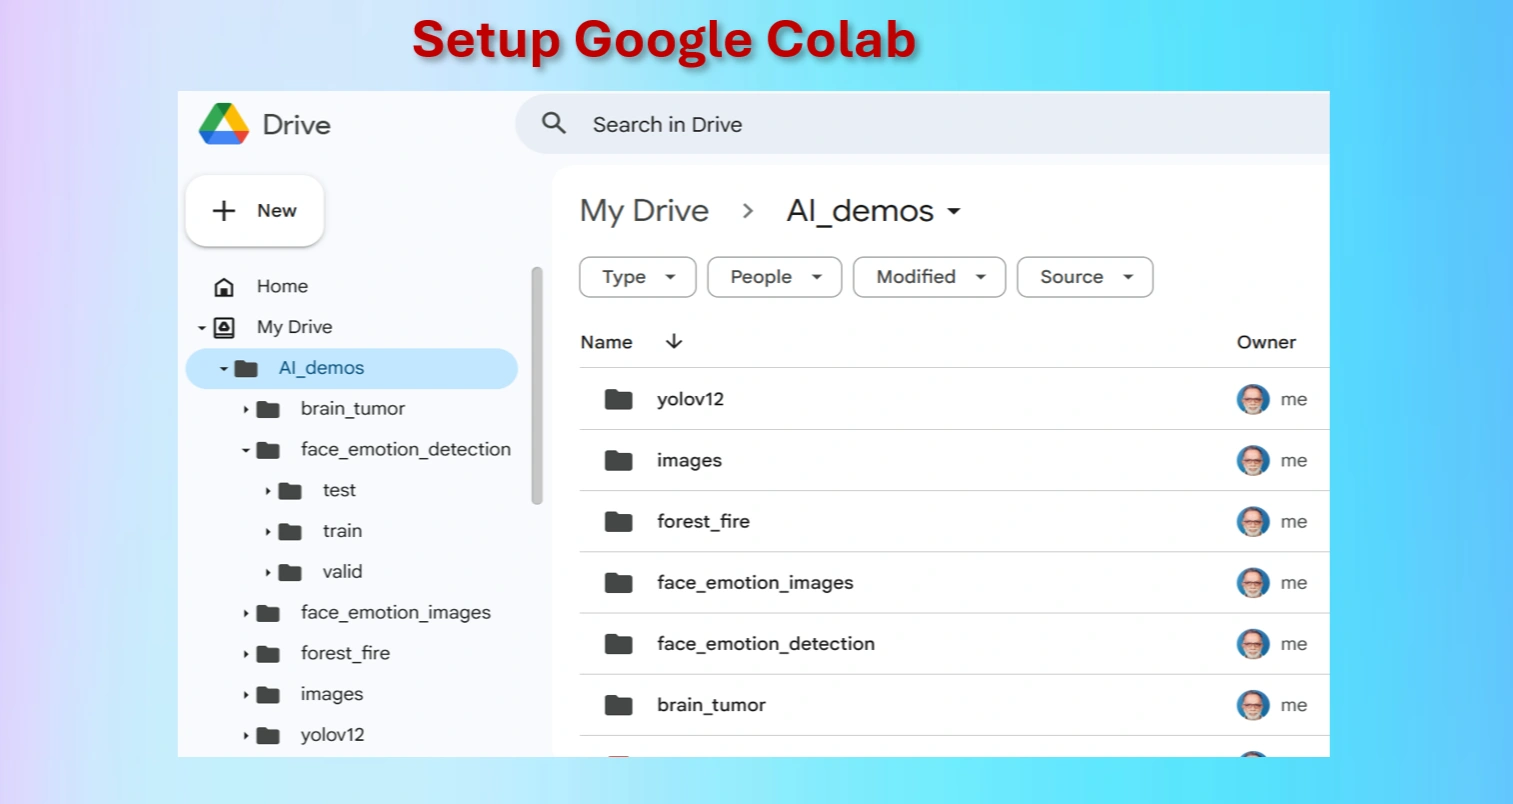
Setting up Google Colab.
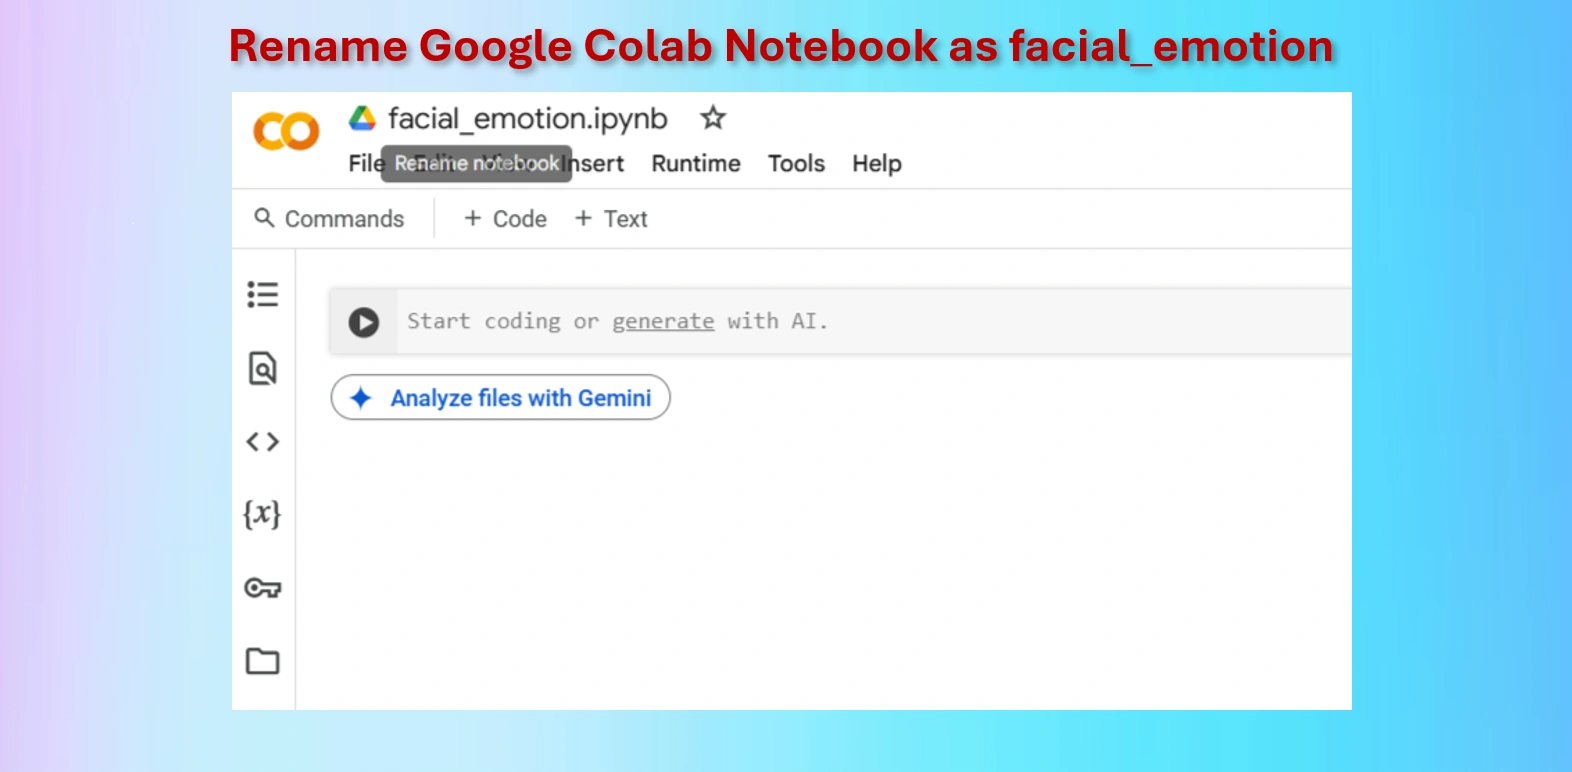
Rename Google Colab Notebook brain_tumor.ipynb.
Google Colab offers free access to GPUs like the NVIDIA T4, which is a powerful hardware accelerator specifically designed for deep learning tasks. Using a GPU instead of a CPU can dramatically improve the speed and efficiency of your machine learning workflows.
Runtime → Change runtime type → GPU to connect a GPU in Colab.For deep learning projects, using a T4 GPU on Google Colab is a game-changer. It significantly reduces training time, improves model accuracy with larger datasets, and provides a seamless experience for machine learning experiments. While CPUs are suitable for small-scale tasks, they are inefficient for advanced AI projects.
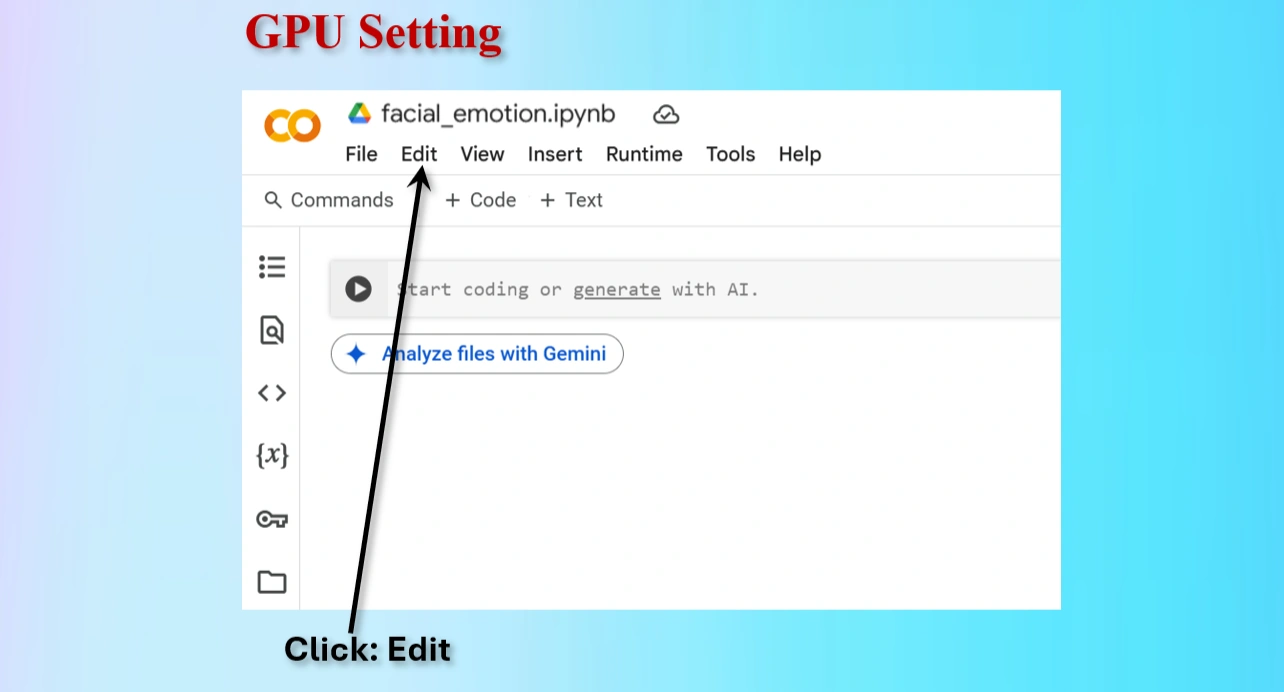
Click on Edit menu on Colab
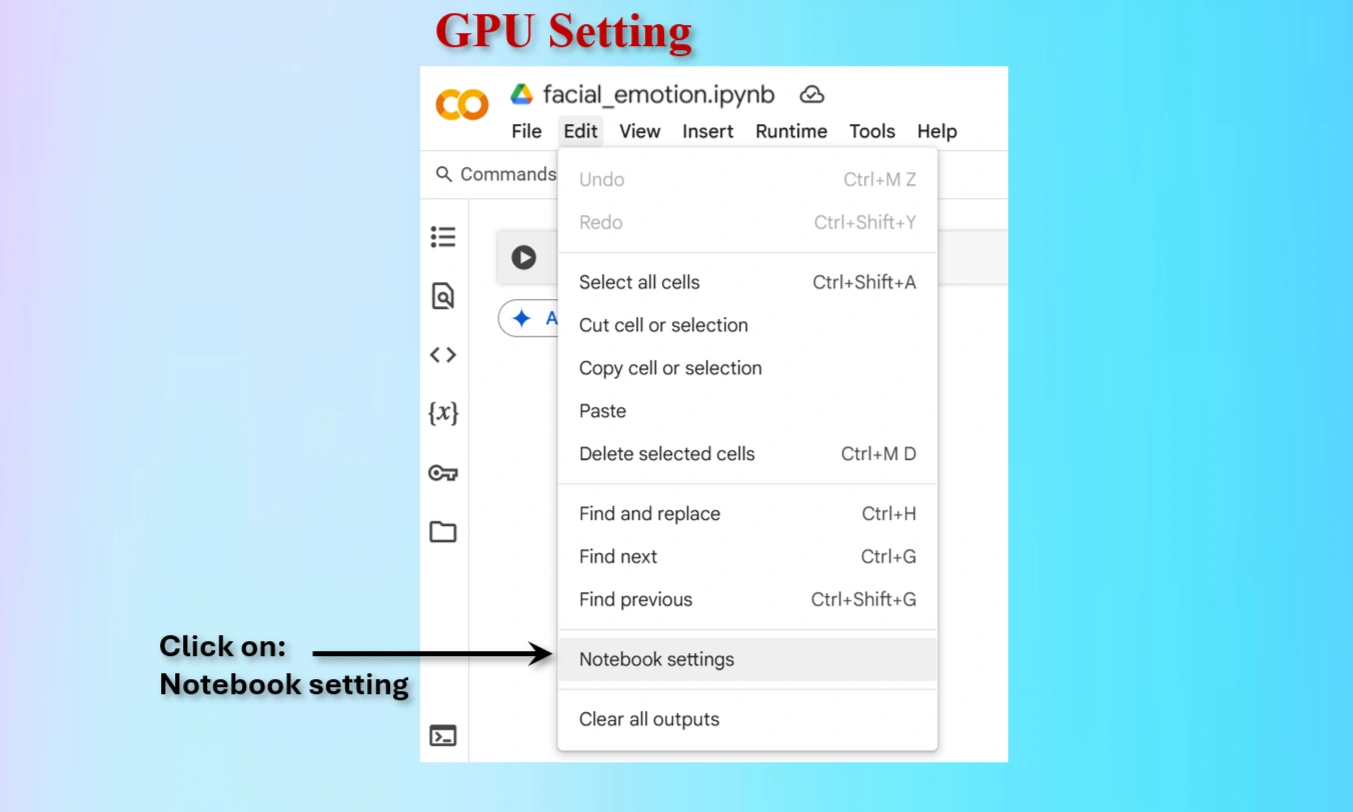
Click on Notebook setting on Colab
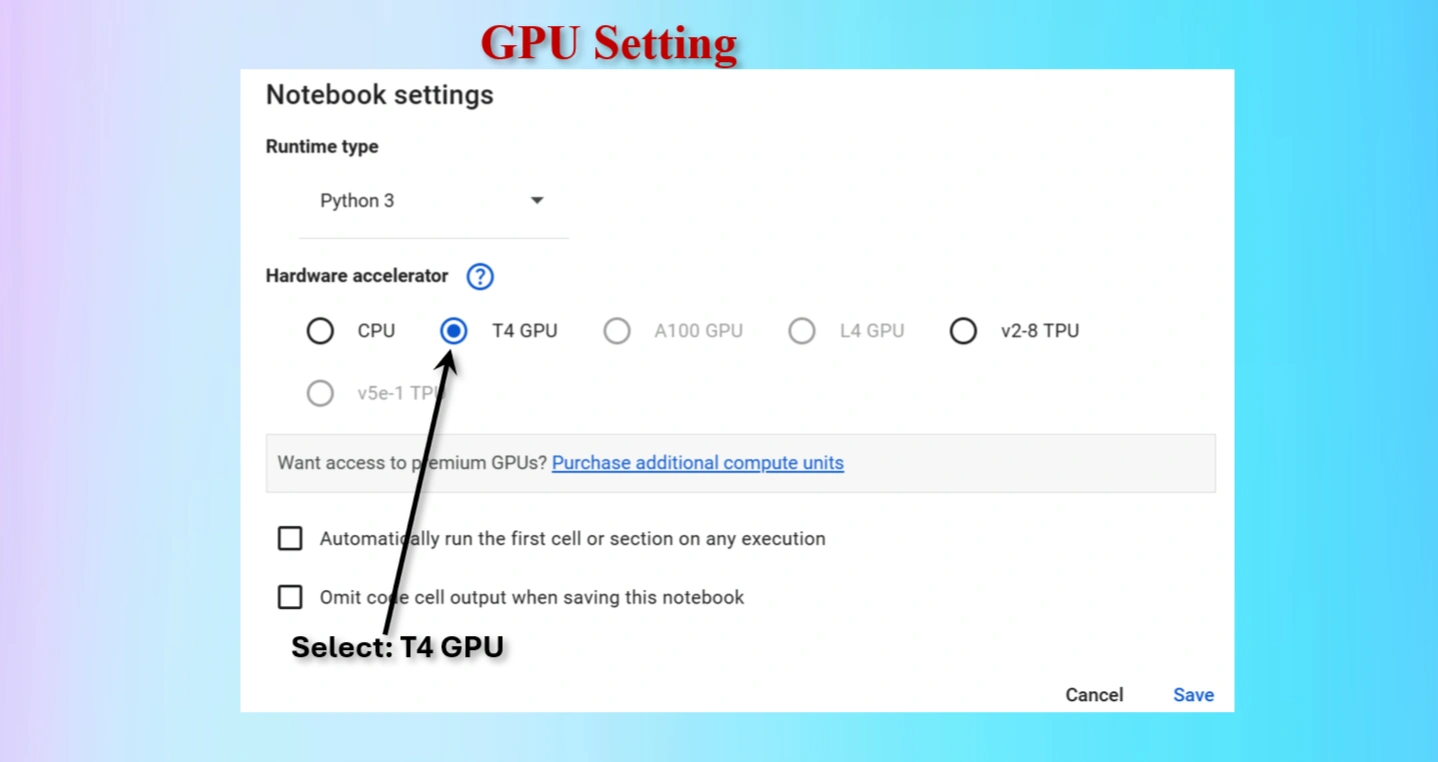
Select T4 GPU and save

Check whether GPU is available or not.
        GPU is available: True
        GPU name: Tesla T4
Output indicates that GPU is available.
        CODES to check GPU availability:

        import torch
        print("GPU is available:", torch.cuda.is_available())
        print("GPU name:", torch.cuda.get_device_name(0) if torch.cuda.is_available() else "No GPU found")
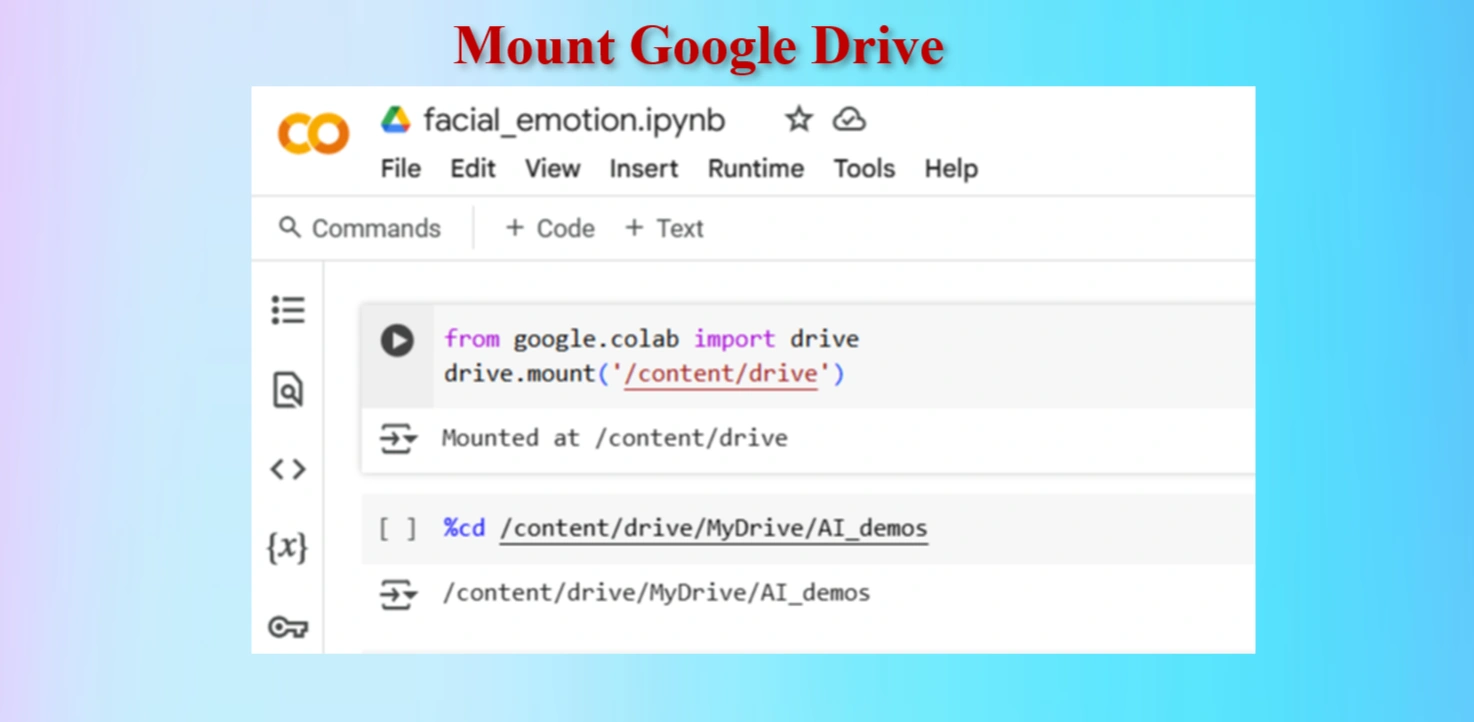
Mount Google drive
        Codes:

        from google.colab import drive
        drive.mount('/content/drive')
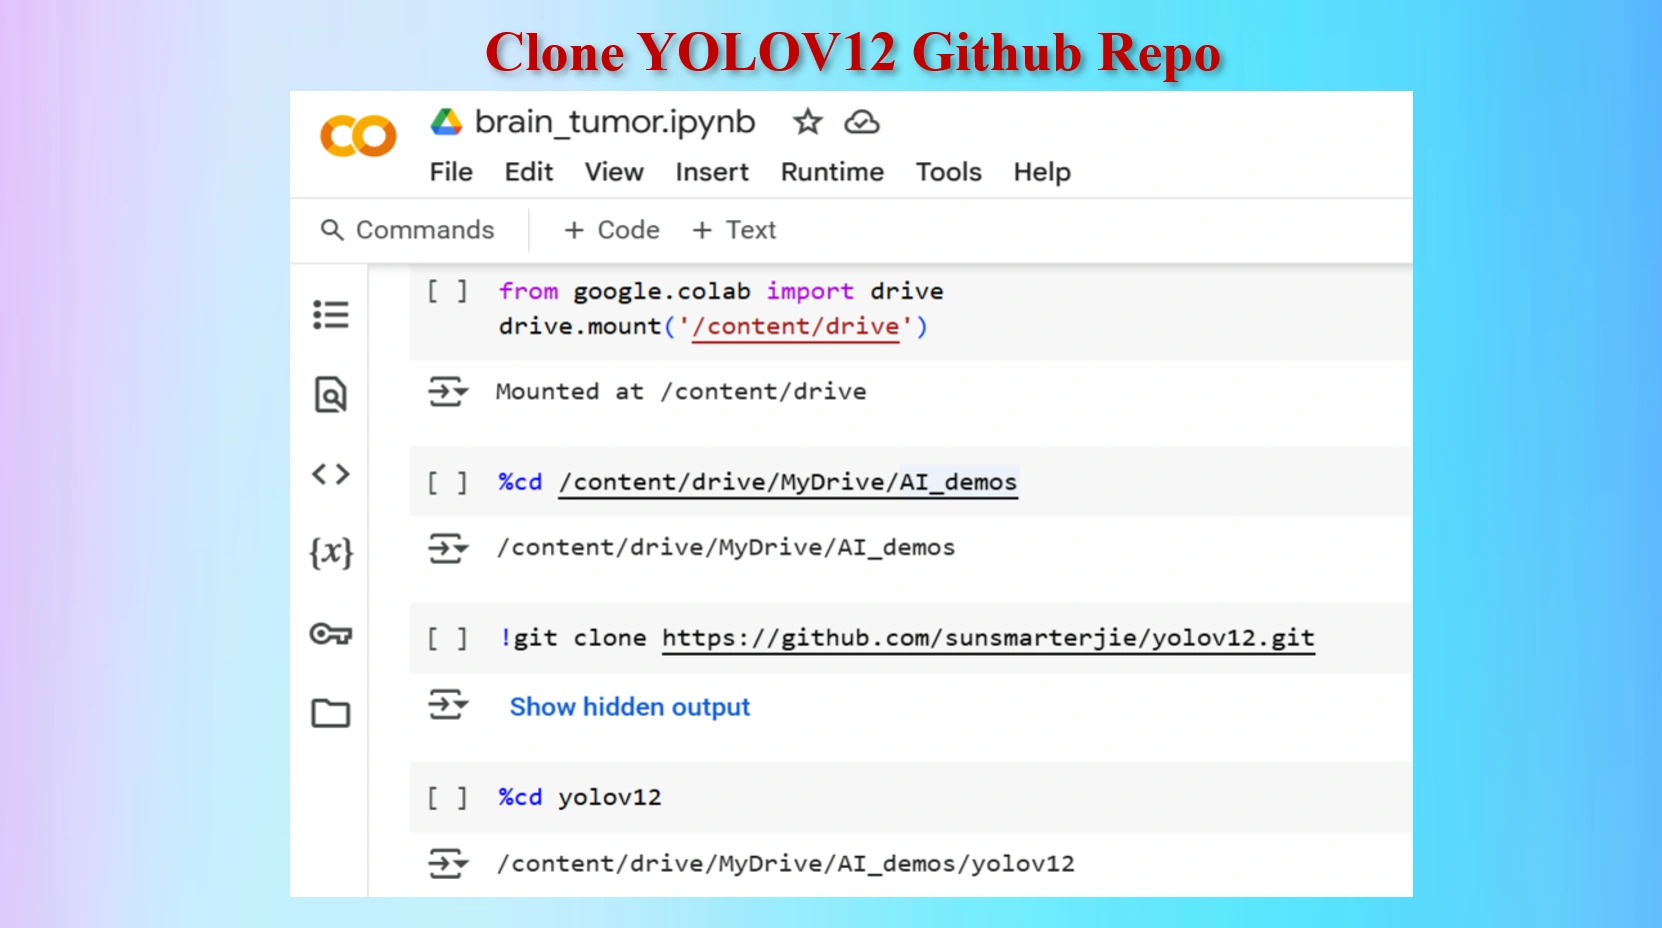
Clone YOLOV12 Github in a Google Colab Cell

Created yolov12 Folder in Google Drive
            Codes:

            #Mount Google drive to colab cell
            from google.colab import drive
            drive.mount('/content/drive')

            %cd /content/drive/MyDrive/AI_demos

            #Clone yolov12 Repo
            !git clone https://github.com/sunsmarterjie/yolov12.git

            #Go to newly created yolov12 folder
            %cd yolov12
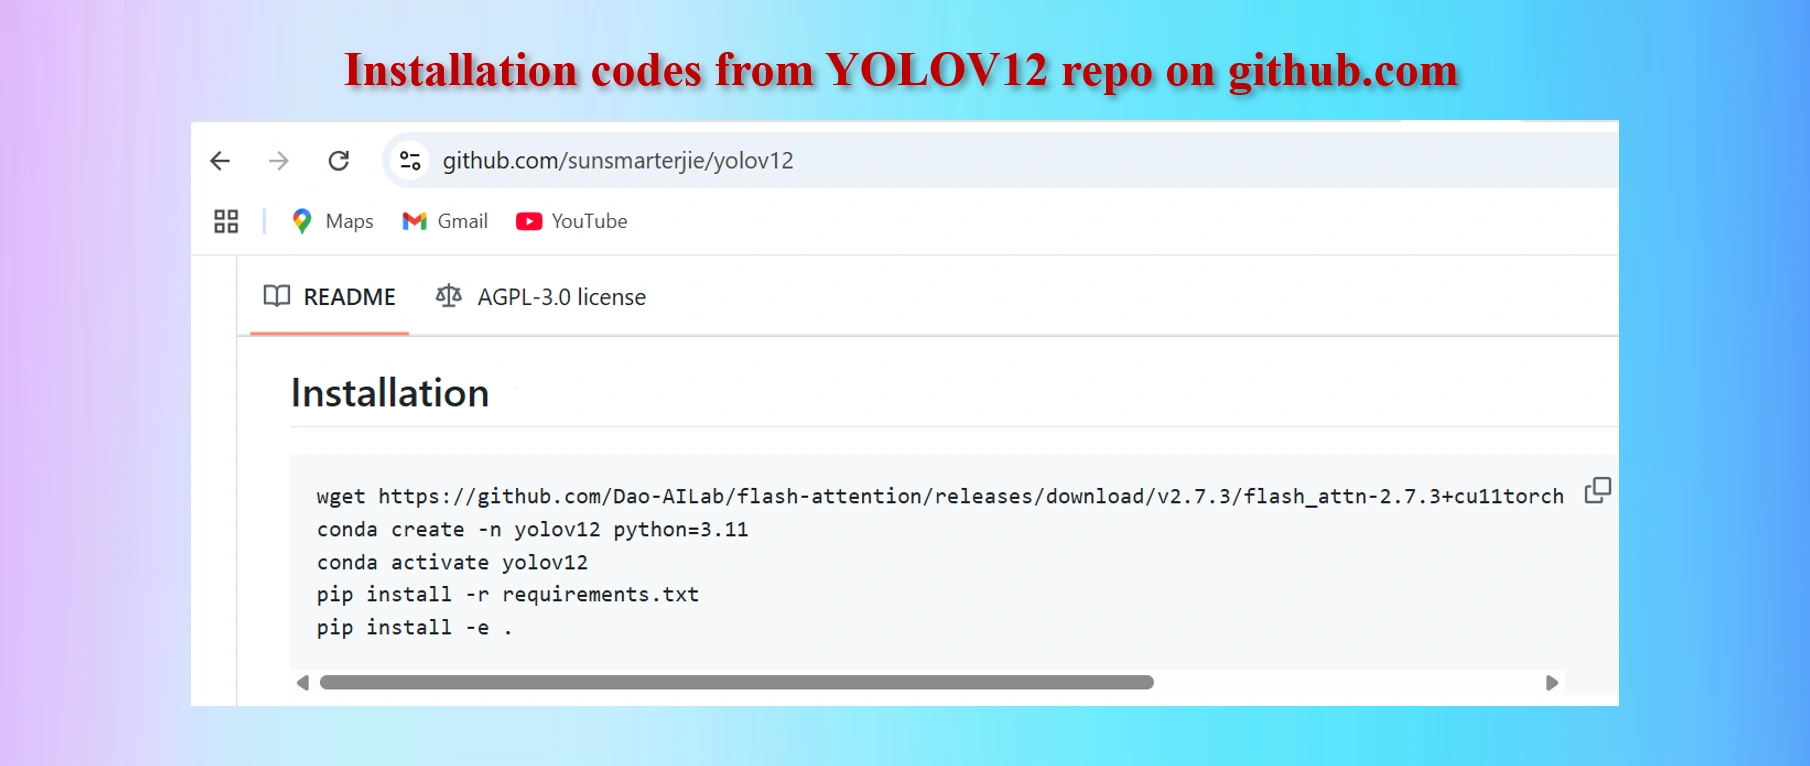
Copy codes from yolov12 github repo
            CODES:

            #Codes to install
            wget https://github.com/Dao-AILab/flash-attention/releases/download/v2.7.3/flash_attn-2.7.3+cu11torch2.2cxx11abiFALSE-cp311-cp311-linux_x86_64.whl
            conda create -n yolov12 python=3.11
            conda activate yolov12
            !pip install -r requirements.txt
            !pip install -e .
We shall have to install lines 1, 4 and 5 above in Colab Notebook cells. However, as we are worlikg in Google Colab environments in Google drive, codes in lines 2 and 3 are not needed. These two lines of codes are needed if we work in a local computer in a separate environment.
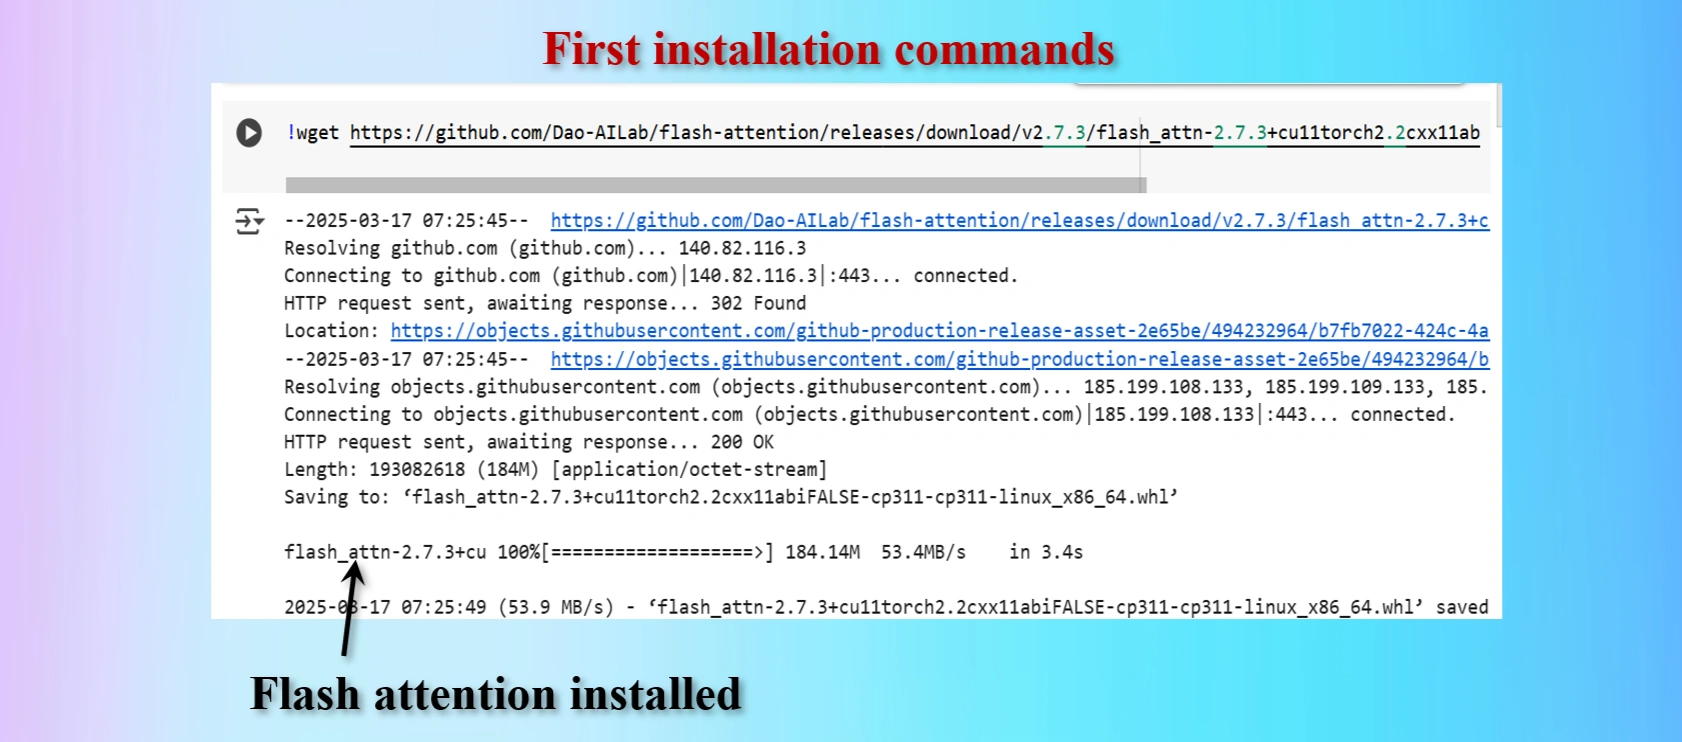
Installed first command copying from yolov12 repo
Displays that Flash_Attention installed
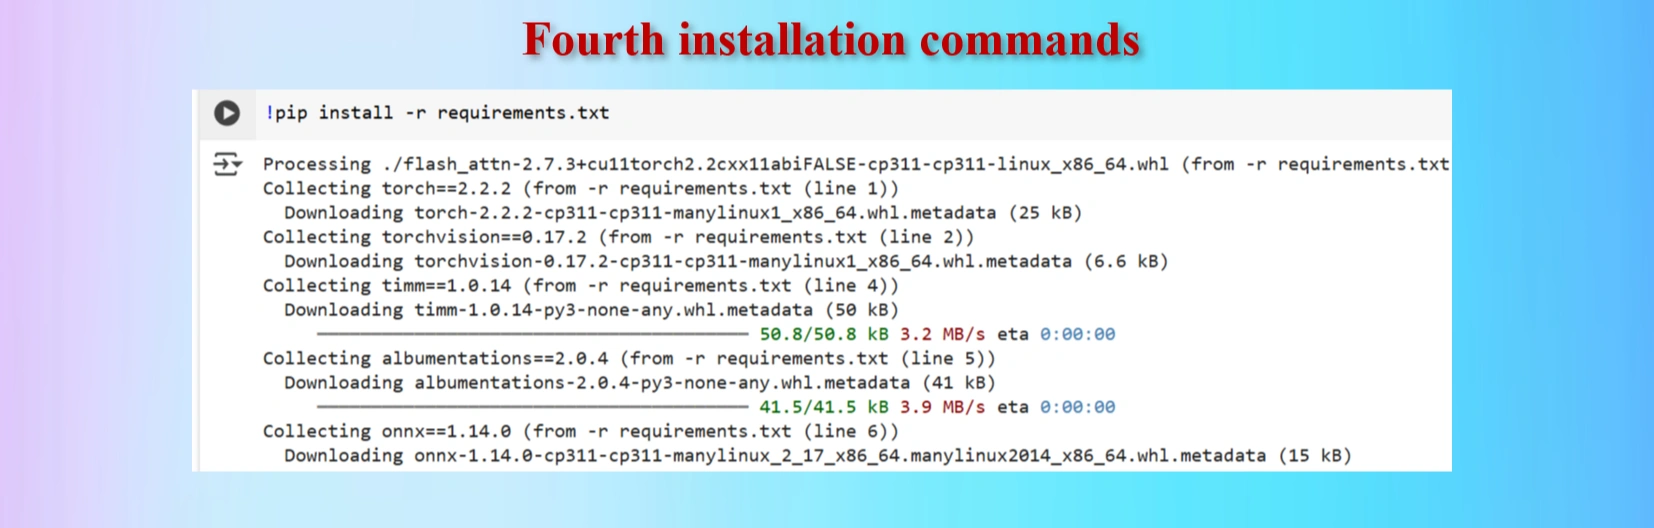
Installed fourth command copying from yolov12 repo
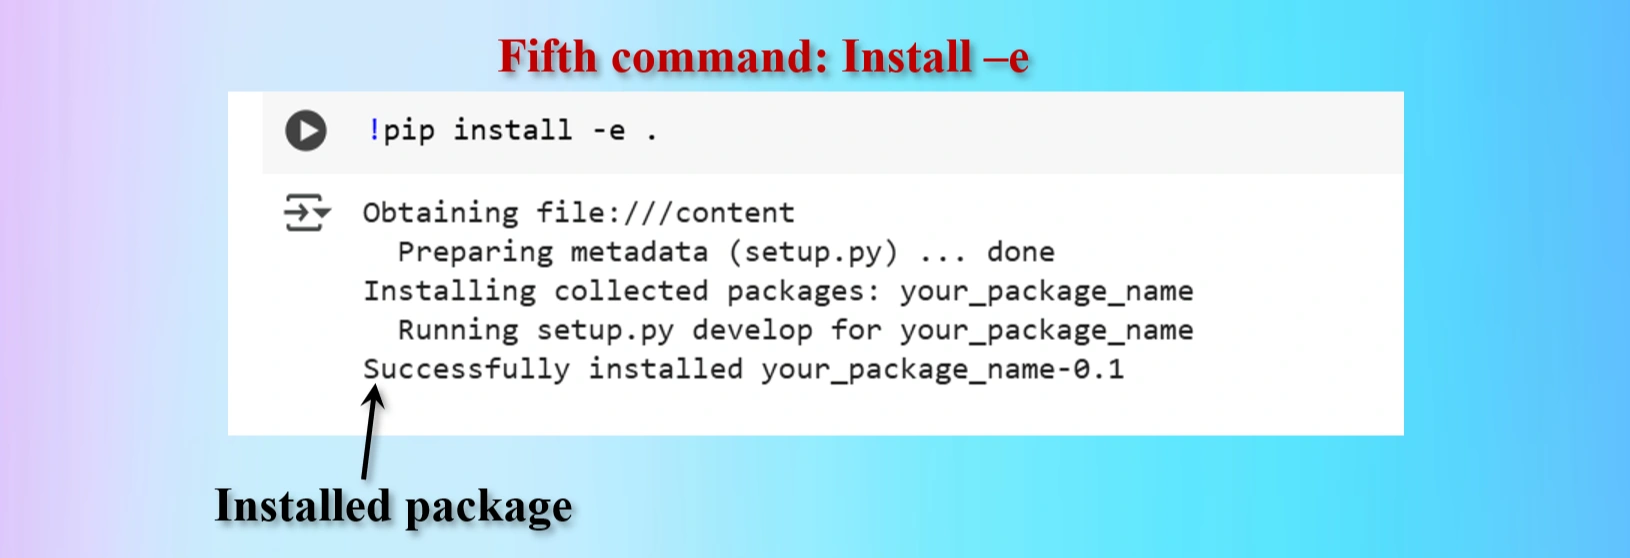
Installed fifth command copying from yolov12 repo
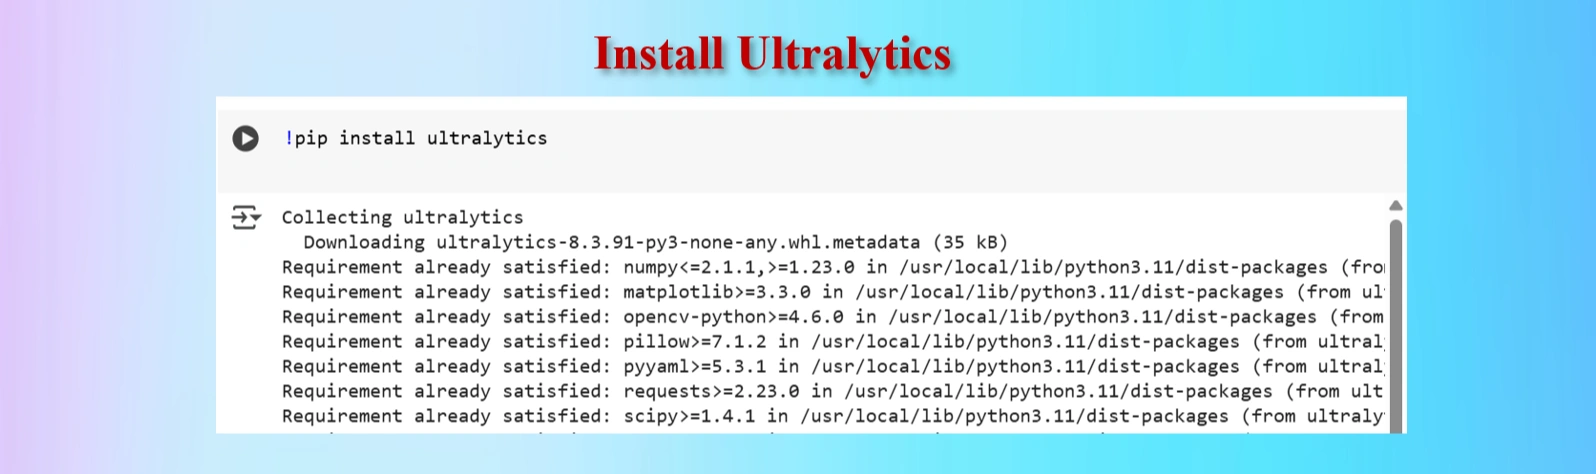
Installed Ultralytics
            CODES:

            #Ultralytics installation
            !pip install ultralytics
Installed Ultralytics
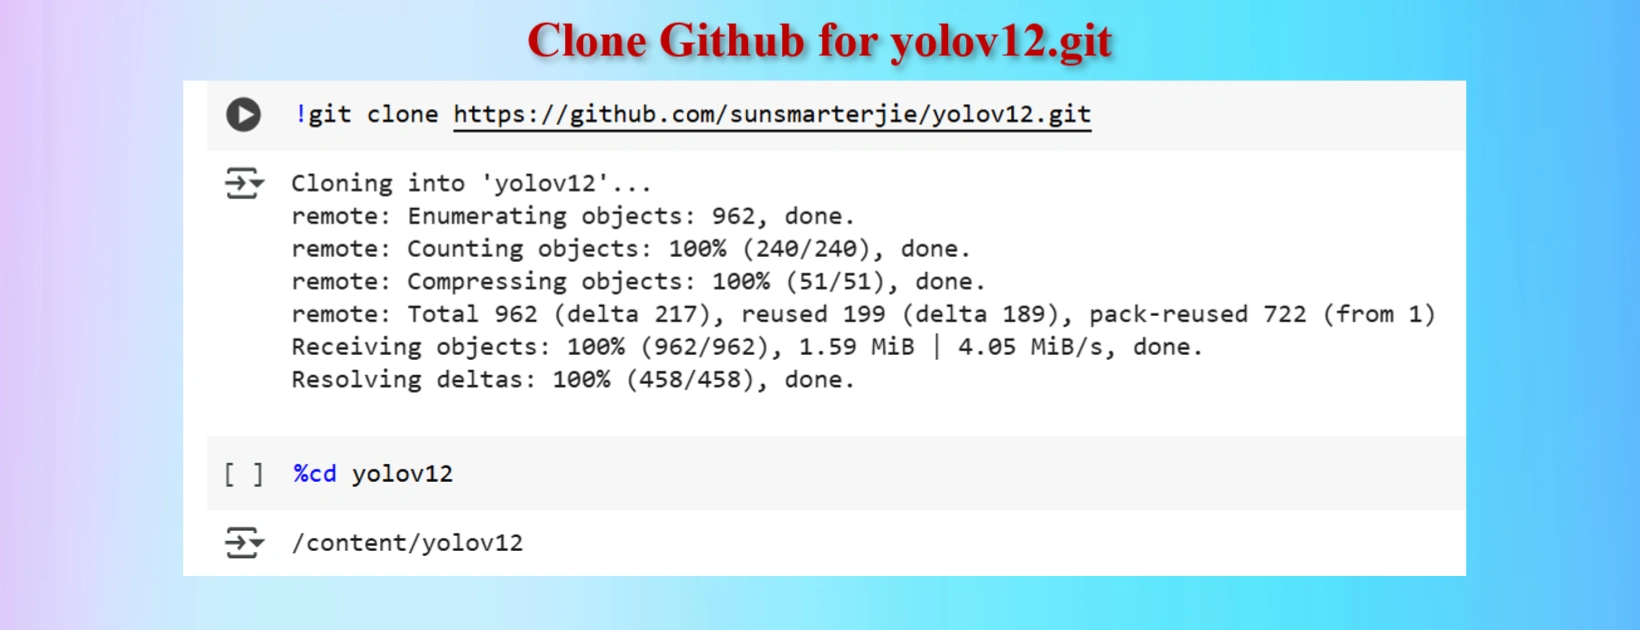
        YOLOV12 Clone Command:

        !git clone https://github.com/sunsmarterjie/yolov12.git
        %cd yolov12
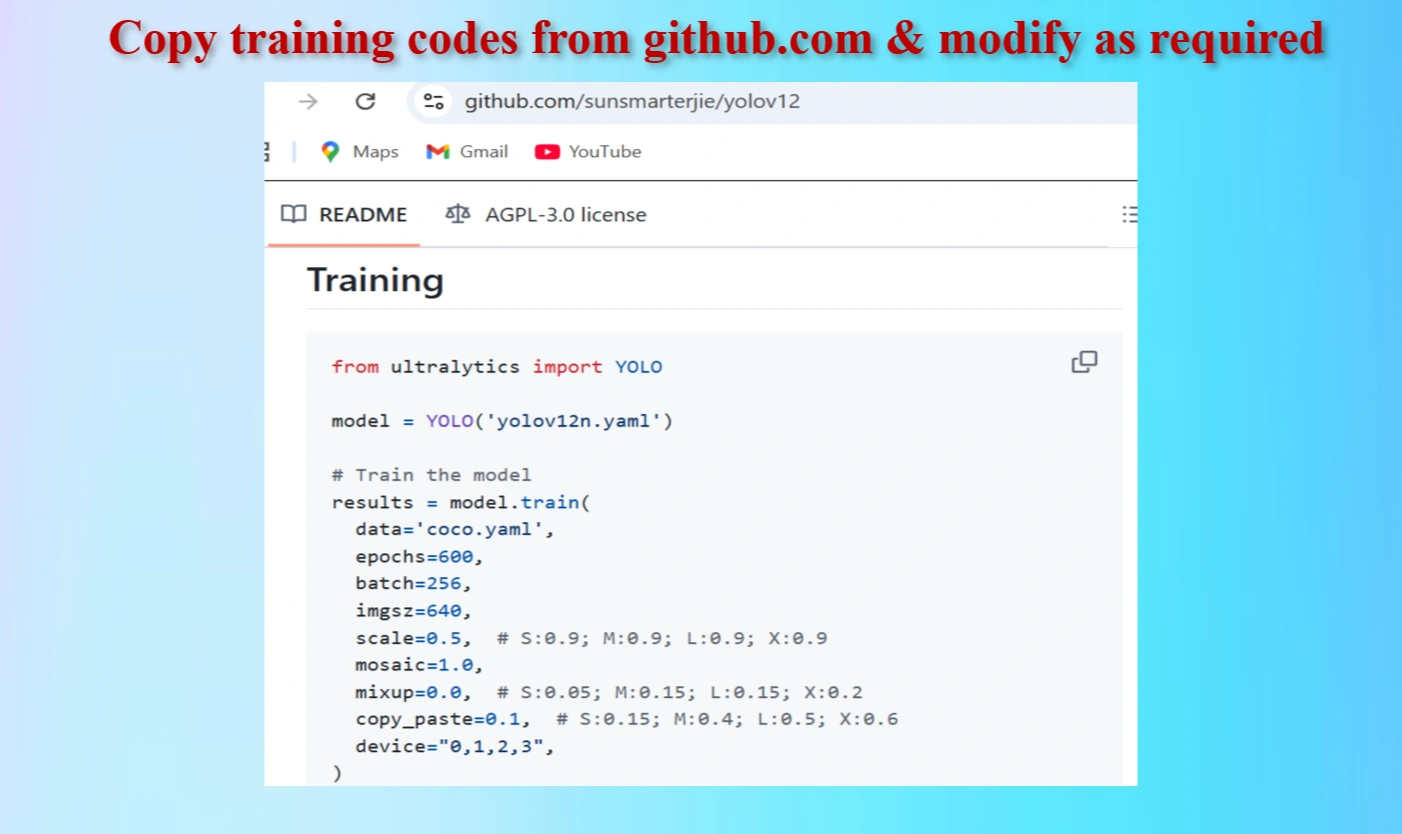
Copied Training Codes & Modify as our requirements
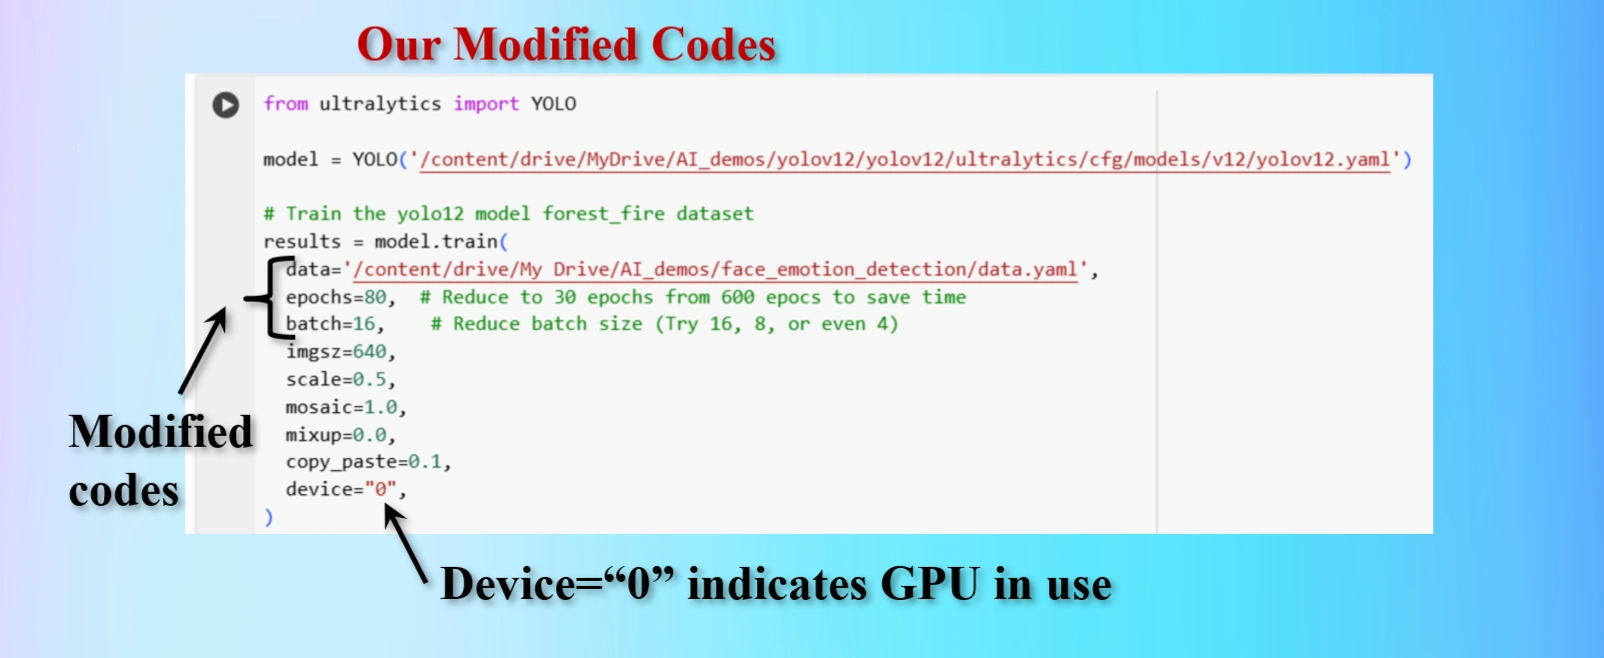
Modified Training codes as per our requirements
We have modifed the codes as below:
        OUR MODIFIED CODES:

        from ultralytics import YOLO

        model = YOLO('/content/drive/MyDrive/AI_demos/yolov12/yolov12/ultralytics/cfg/models/v12/yolov12.yaml')

        # Train the yolo12 model forest_fire dataset
        results = model.train(
        data='/content/drive/My Drive/AI_demos/face_emotion_detection/data.yaml',
        epochs=80,  # Reduce to 80 epochs from 600 epocs to save time
        batch=16,    # Reduce batch size (Try 16, 8, or even 4)
        imgsz=640,
        scale=0.5,
        mosaic=1.0,
        mixup=0.0,
        copy_paste=0.1,
        device="0",
        )
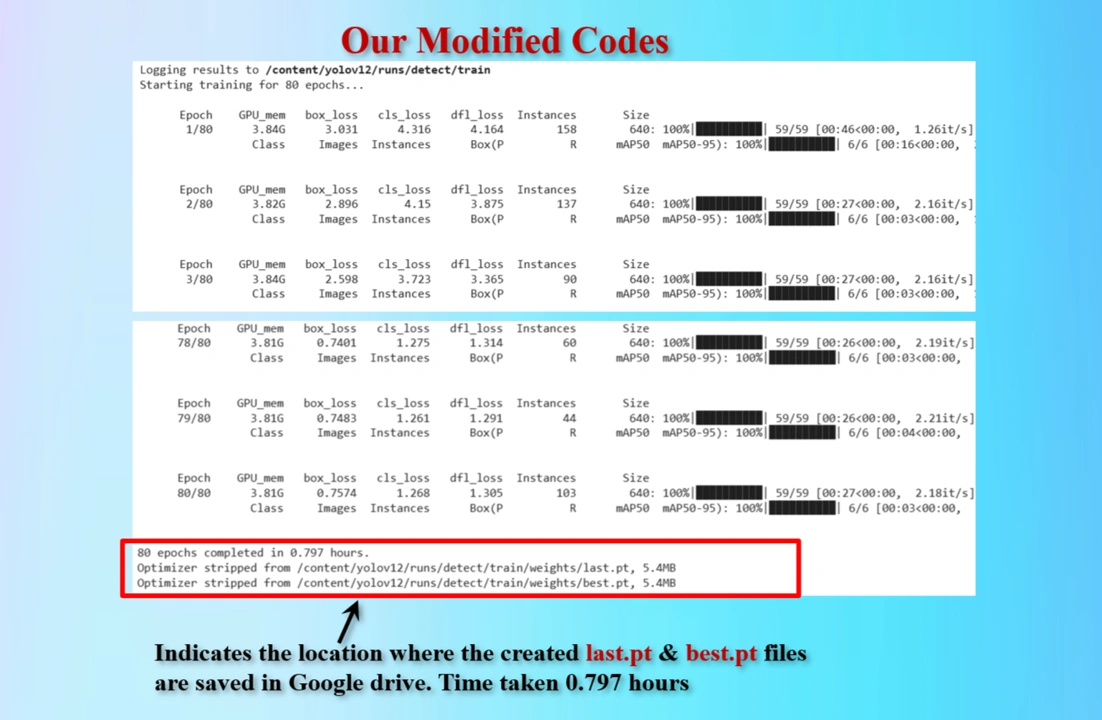
Display shows the locations of created last.pt & best.pt files that are saved.
80 epochs took 0.797 hours.
Therefore, suggested 600 epochs would take 6+ hours.
To reduce train time we have modified epochs = 80.
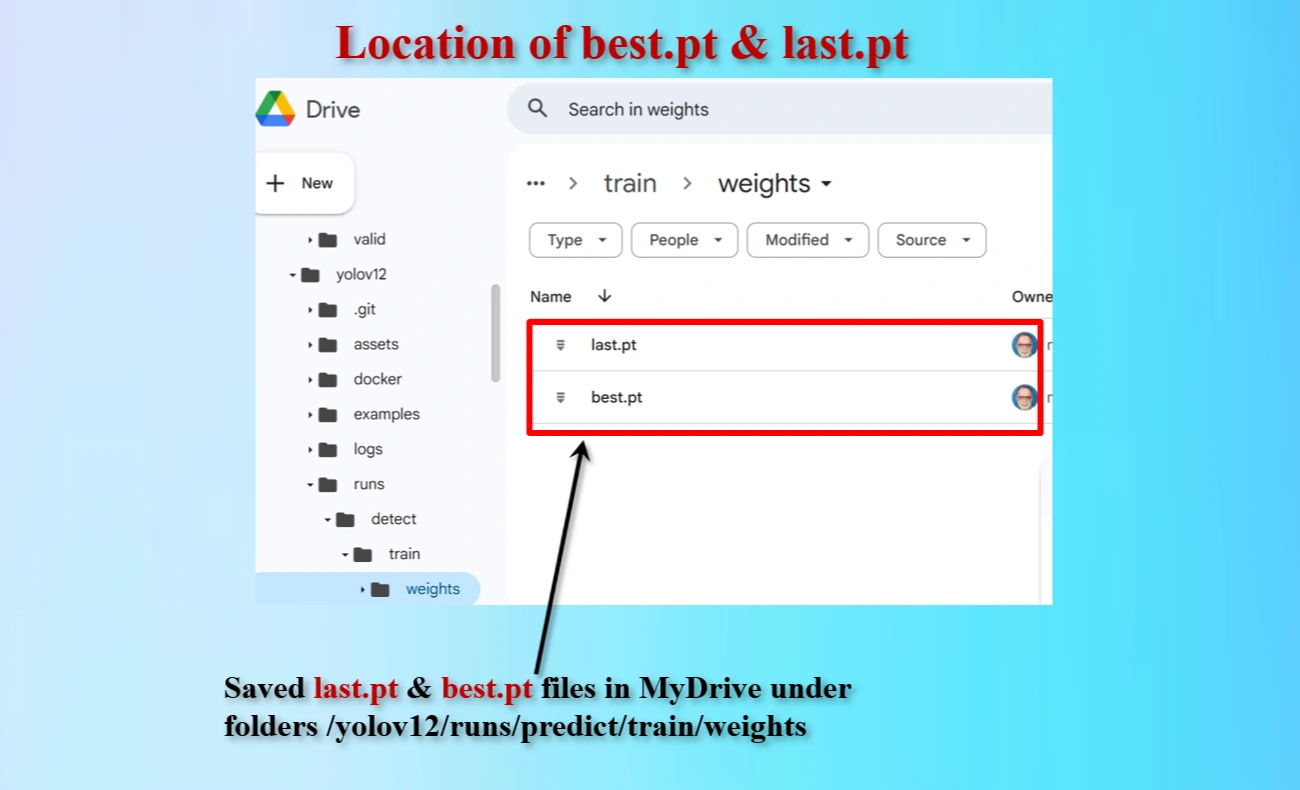
Directory locations of created last.pt & best.pt files that are saved.
Test the YOLO model to detect fire and smoke on an image named.
Test the model to detect Brain tumor on an image.
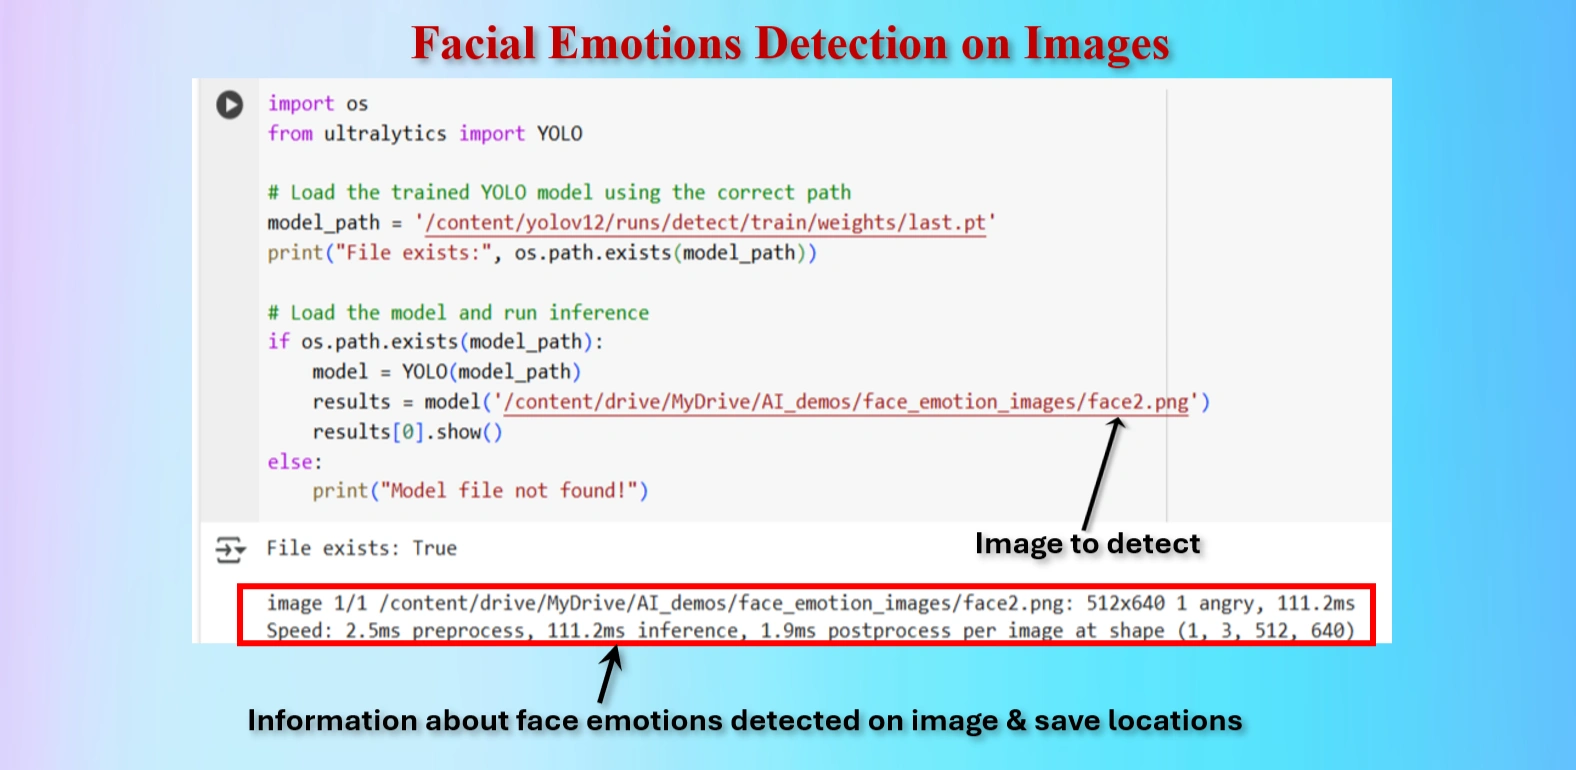
        CODES:

        from ultralytics import YOLO

        # Load the trained YOLO model using the correct path
        model_path = '/content/yolov12/runs/detect/train/weights/best.pt'
        print("File exists:", os.path.exists(model_path))

        # Load the model and run inference
        if os.path.exists(model_path):
            model = YOLO(model_path)
            results = model('/content/drive/MyDrive/AI_demos/face_emotion_images/face2.png')
            results[0].show()
        else:
            print("Model file not found!")
Similarly we have testeg tumors on the following images:
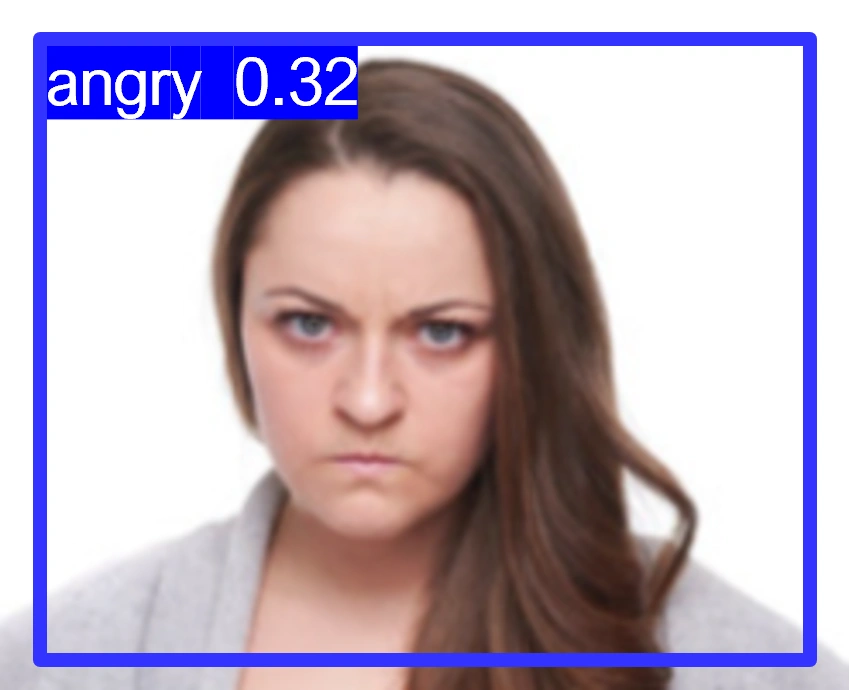
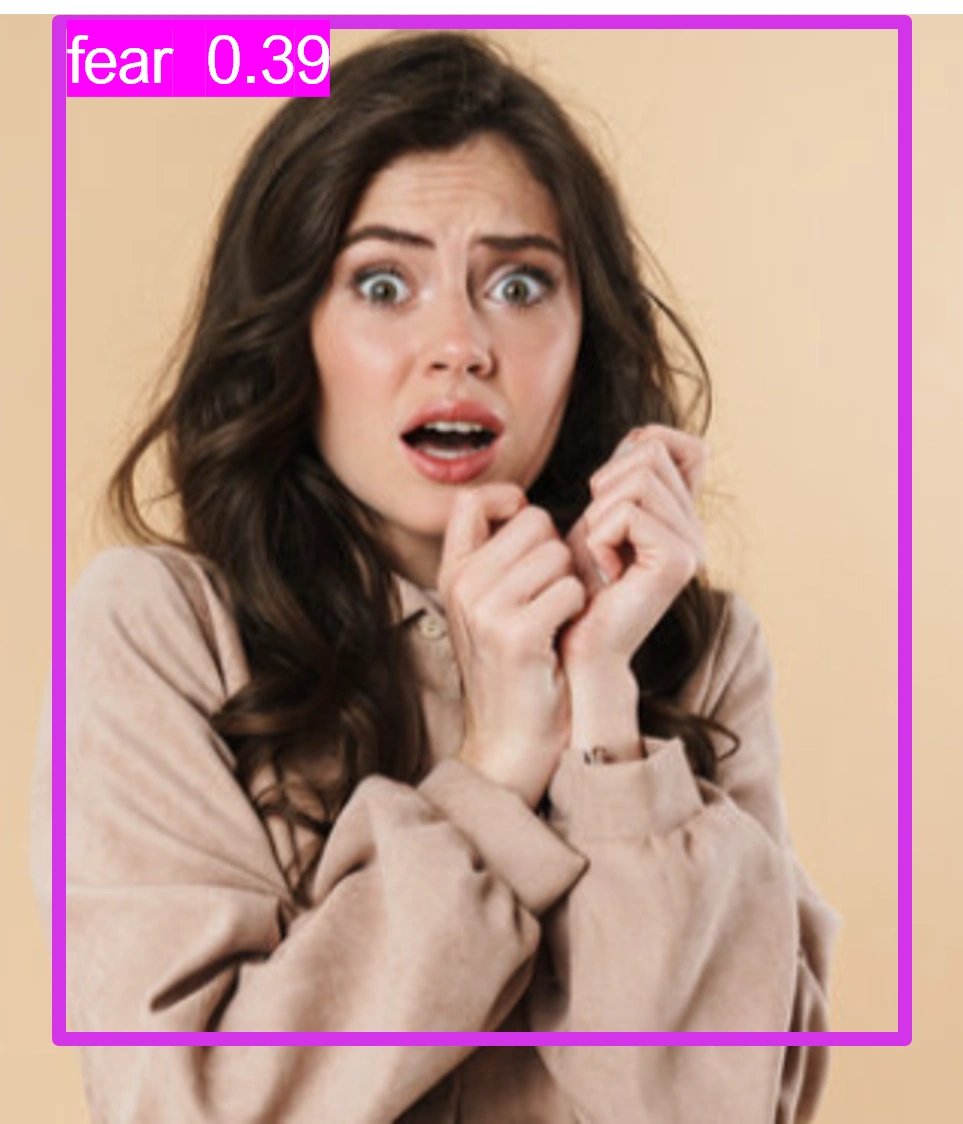
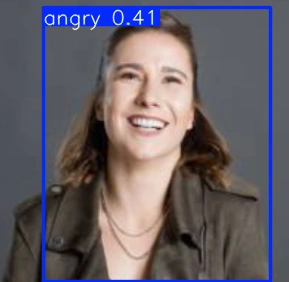
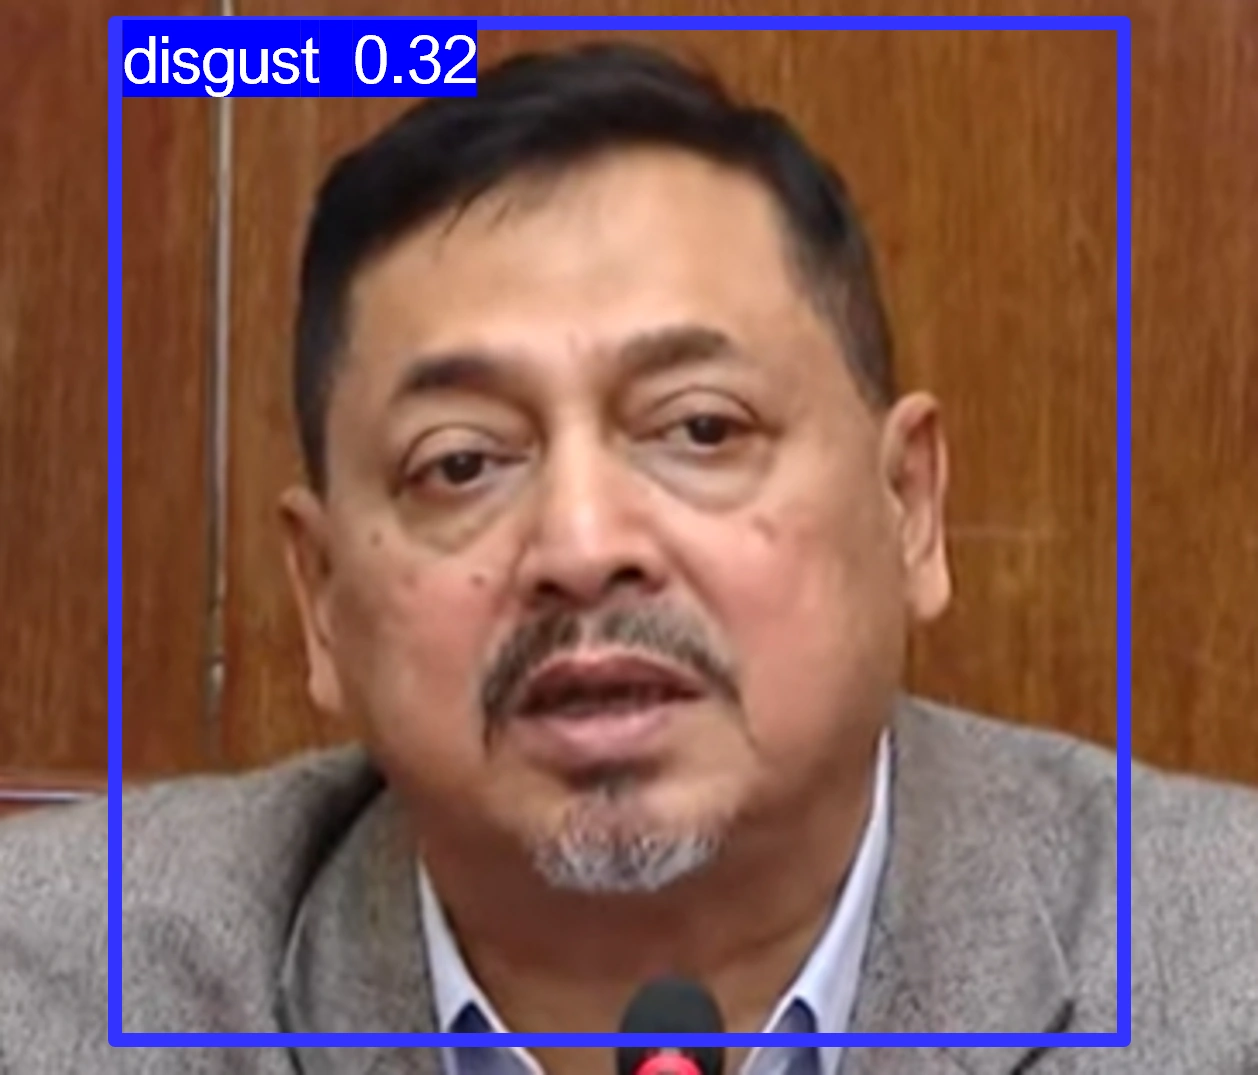
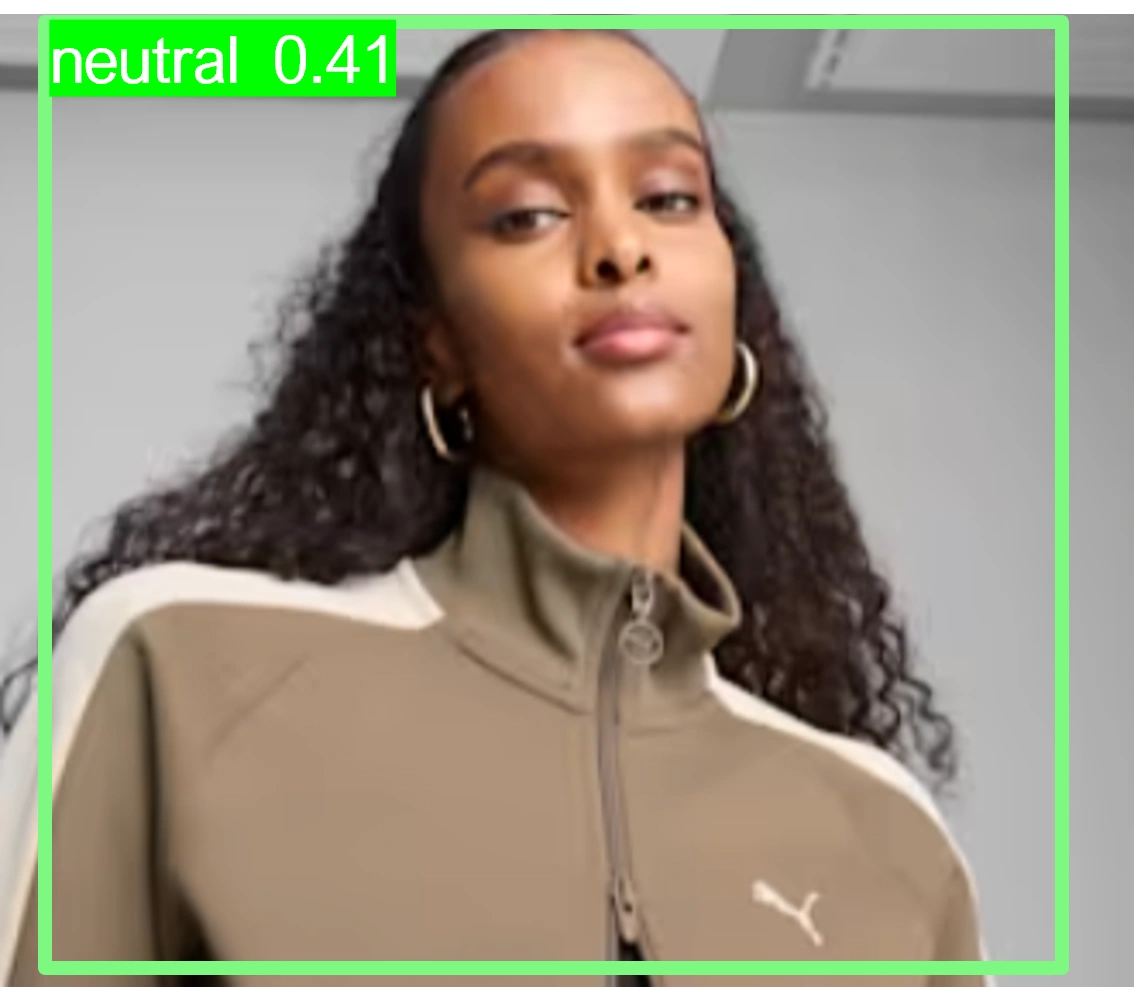
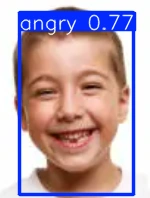
| Serial | Images Before Emotion Detection | Images After Emotion Detection | Results |
|---|---|---|---|
| 1 |  |
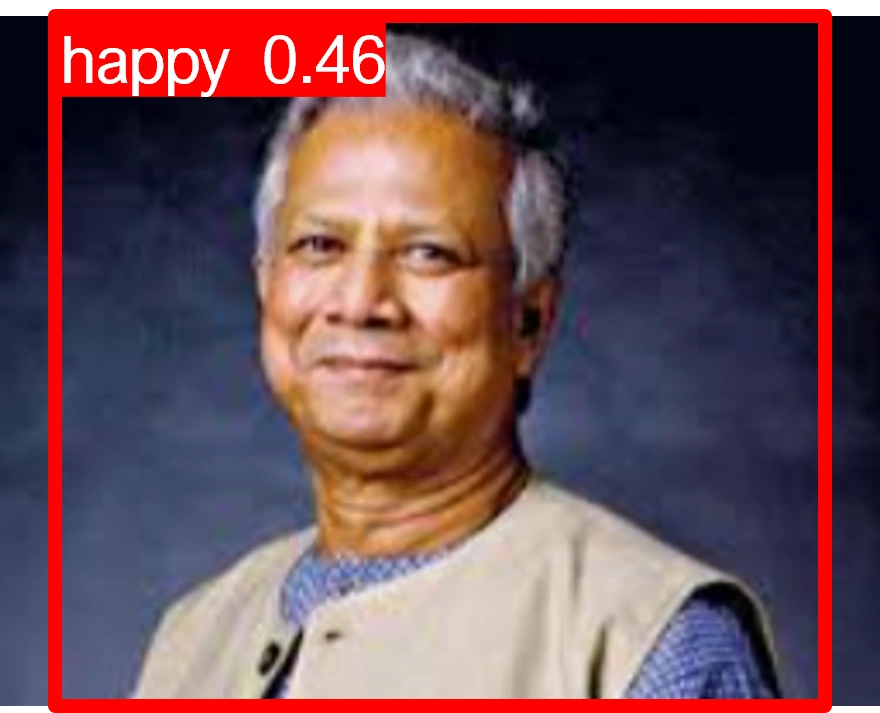 |
Correct |
| 2 |  |
 |
Correct |
| 3 |  |
 |
Correct |
| 4 |  |
 |
Correct |
| 5 |  |
 |
Wrong |
| 6 |  |
 |
Correct |
| 7 |  |
 |
Correct |
| 8 |  |
 |
Wrong |
Note:
Using an online GPU, after training the YOLOv12 model with a custom dataset, it successfully detected 75% cases of Human Facial Emotions. This limitation is primarily due to insufficient training. While it was recommended to run the training for 600 epochs for optimal performance, we completed only 80 epochs to reduce training time. The process took approximately 0.797 hours. Based on this, running the full 600 epochs would require an estimated 6 hours using GPU.
However, without a GPU, using a normal CPU would significantly increase the training time. It would take about 13 hours to run 80 epochs. Therefore, completing 600 epochs would take approximately 200 hours, equivalent to about 8.33 days.
Please try to use online INVIDIA T4 GPU in Google Colab instead of local CPU, to reduce training time of YOLOV12 models on custom datasets
The YOLOv12 training on a custom dataset of facial emotions was completed. The model partially detected the facial emotions, but it could not detect facial emotions due to insufficient training epochs. Further training with the recommended number of epochs or additional dataset augmentation may enhance facial Emotions detection accuracy.
 www.HoqueAi.com