
AI Generated image: YOLOv12 for Forest Fire Detection
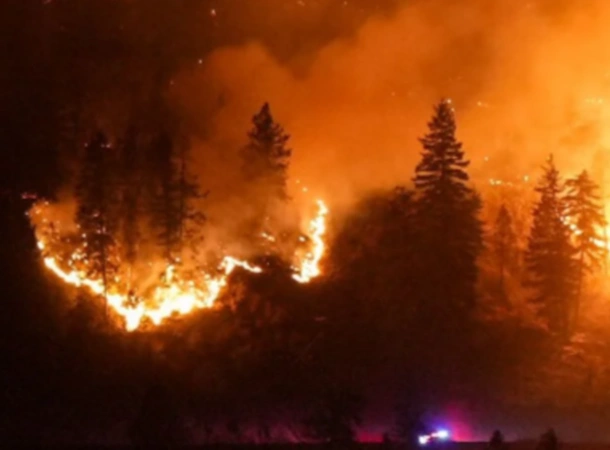
Forest fire detection using the part of video:"Forest Fire
Threatens Homes In Carolina Forest".
Courtesy: The Myrtle Beach Sun News
VIDEO: Click on play arrow icon to play the video.
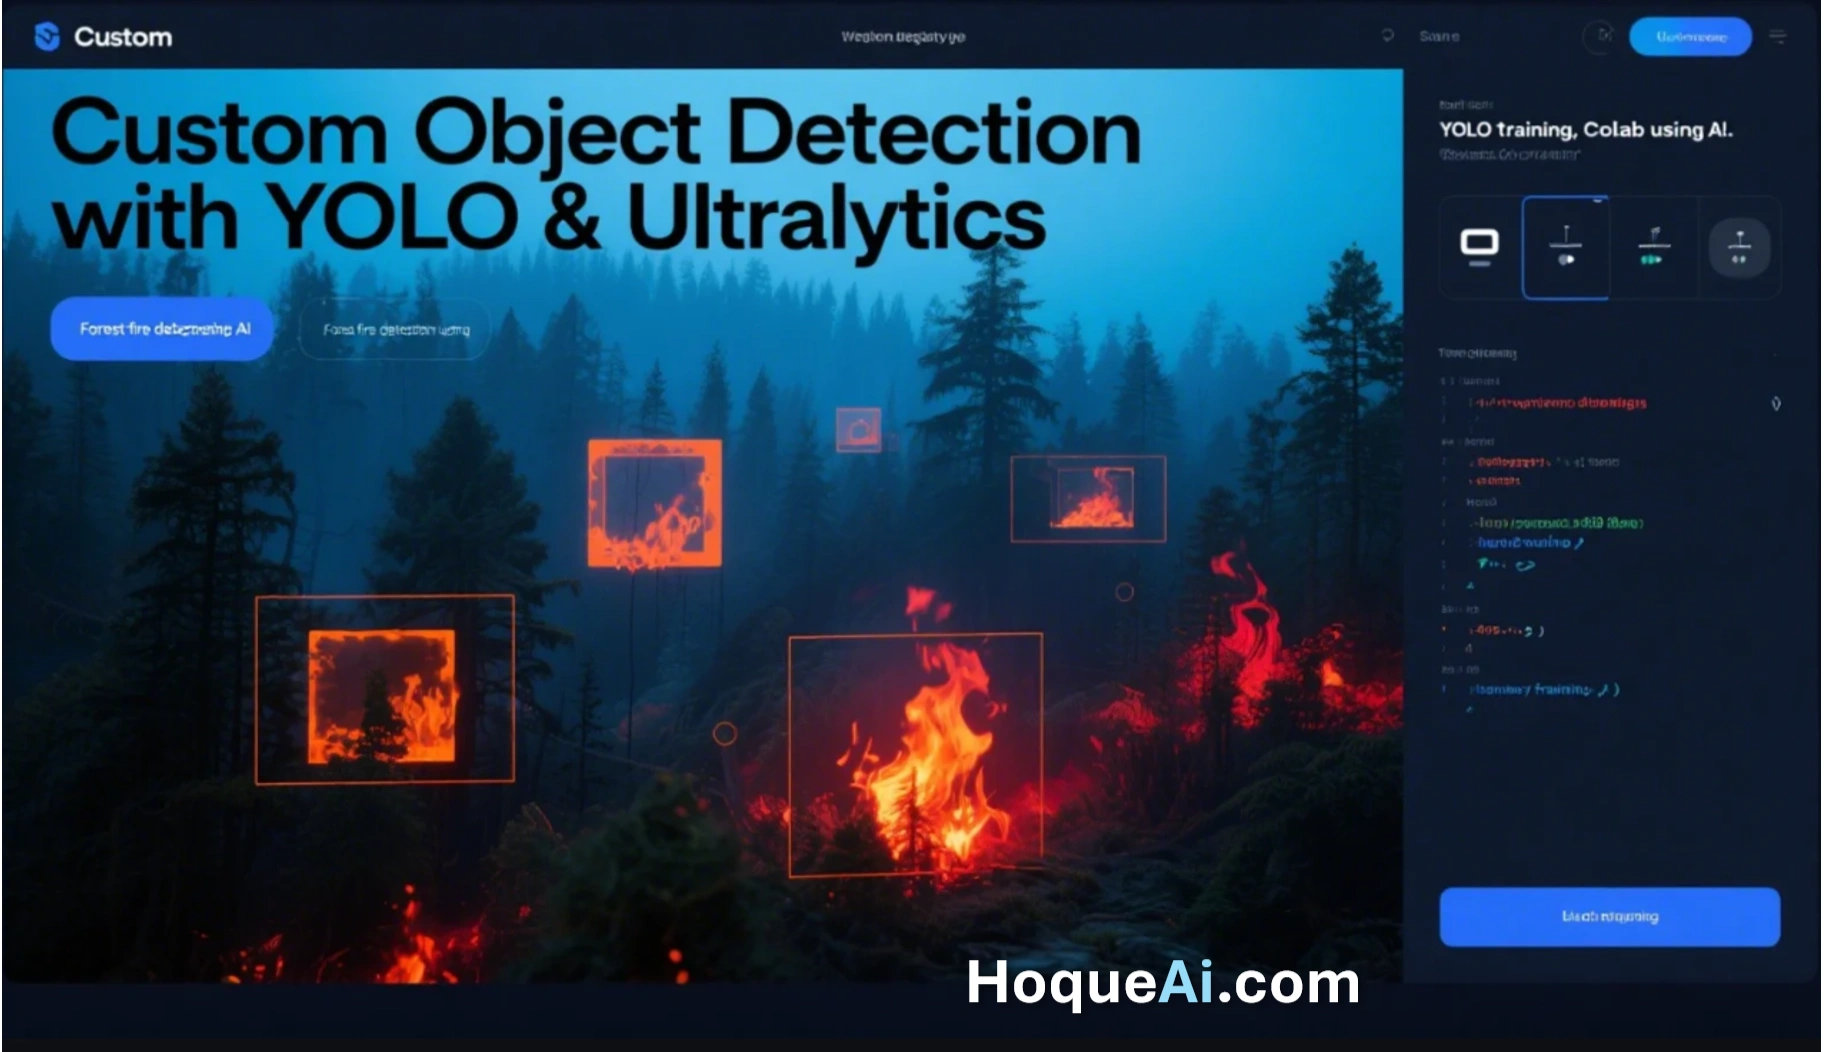
Object detection has significantly evolved with the introduction of YOLO (You Only Look Once) models, particularly with the latest advancements in YOLOv12. While pre-trained YOLO models excel at recognizing objects from standard datasets like COCO, real-world applications often require detecting custom objects not included in these datasets. One critical use case is forest fire detection, where early identification can prevent large-scale environmental disasters.
In this guide, we explore how to train YOLOv12 on a custom dataset for forest fire detection, from dataset preparation to model training and evaluation. By leveraging transfer learning and fine-tuning techniques, we aim to enhance the model’s ability to identify wildfires accurately, improving response times and mitigation strategies.
Would you like a section outline for the page as well? 🚀.
Most YOLO models are trained on the COCO dataset, which consists of 80 different classes. If we need to detect an object that is already included in these 80 classes, we can directly use these pre-trained models, load them, and test them.
Default pre-trained COCO Dataset models contain following objects for detections.
|
1. Person 2. Bicycle 3. Car 4. Motorcycle 5. Airplane 6. Bus 7. Train 8. Truck 9. Boat 10. Traffic light 11. Fire hydrant 12. Stop sign 13. Parking meter 14. Bench 15. Bird 16. Cat |
17. Dog 18. Horse 19. Sheep 20. Cow 21. Elephant 22. Bear 23. Zebra 24. Giraffe 25. Backpack 26. Umbrella 27. Handbag 28. Tie 29. Suitcase 30. Frisbee 31. Skis 32. Snowboard |
33. Sports ball 34. Kite 35. Baseball bat 36. Baseball glove 37. Skateboard 38. Surfboard 39. Tennis racket 40. Bottle 41. Wine glass 42. Cup 43. Fork 44. Knife 45. Spoon 46. Bowl 47. Banana 48. Apple |
49. Sandwich 50. Orange 51. Broccoli 52. Carrot 53. Hot dog 54. Pizza 55. Donut 56. Cake 57. Chair 58. Couch 59. Potted plant 60. Bed 61. Dining table 62. Toilet 63. TV 64. Laptop |
65. Mouse 66. Remote 67. Keyboard 68. Cell phone 69. Microwave 70. Oven 71. Toaster 72. Sink 73. Refrigerator 74. Book 75. Clock 76. Vase 77. Scissors 78. Teddy bear 79. Hairdryer 80. Toothbrush |
B y default, YOLO modules are trained on Coco Dataset, that contains 80 objects.
In a custom dataset, YOLO modules are trained to detect objects that are not included in the COCO dataset, such as fire, smoke, or car registration numbers. After training, the model can identify these objects in new images.
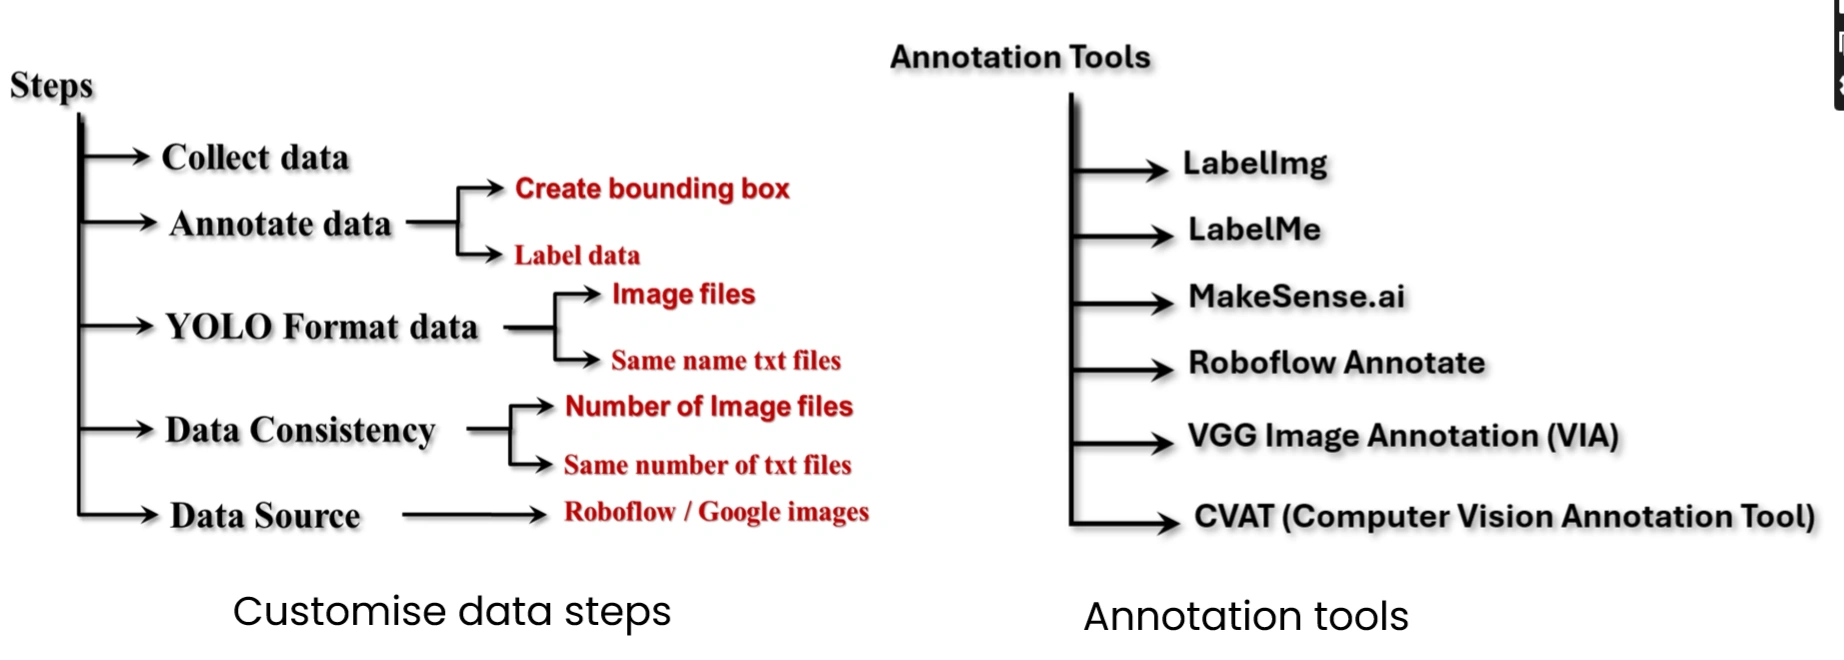
A. Data Collection: Gather images of the objects that YOLO needs to detect. Store these images in a dedicated folder.
B. Annotation: Use annotation tools to create bounding boxes around the objects and assign appropriate labels.
C. Data Formatting: YOLO models require that each image has a corresponding annotation file in text format. Both the image file and its annotation file must share the same name. This format is consistent across YOLO versions, from YOLOv5 to YOLOv12.
D. Ensuring Consistency: The number of annotation text files must match the number of images. For example, if there are 100 images, there should be 100 corresponding annotation files.
E. Data Sources:
Example: Today, I am working with a forest fire dataset downloaded from the Roboflow website.
Our Directory structure should be:
    Dataset/
    │── images/
    │   ├── train/    # Training images
    │   ├── val/      # Validation images
    │   ├── test/     # Test images
    │── labels/
    │   ├── train/    # Corresponding YOLO annotation text files for training images
    │   ├── val/      # Corresponding YOLO annotation text files for validation images
    │   ├── test/     # Corresponding YOLO annotation text files for test images
    │── classes.txt   # List of class names in the dataset
Our directory structure for custom data
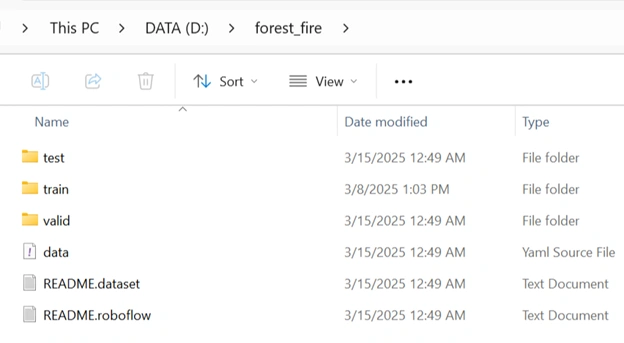
The downloaded annotated dataset contains a total of 910 images in JPG format and 910 TXT files with names matching the corresponding image files. The distribution is as follows:
train/images folder)train/labels folder)test/images folder)test/labels folder)valid/images folder)valid/labels folder)The dataset is divided into training, validation, and test sets in the following proportions:
The downloaded dataset also contains a file named data.yaml which contains:
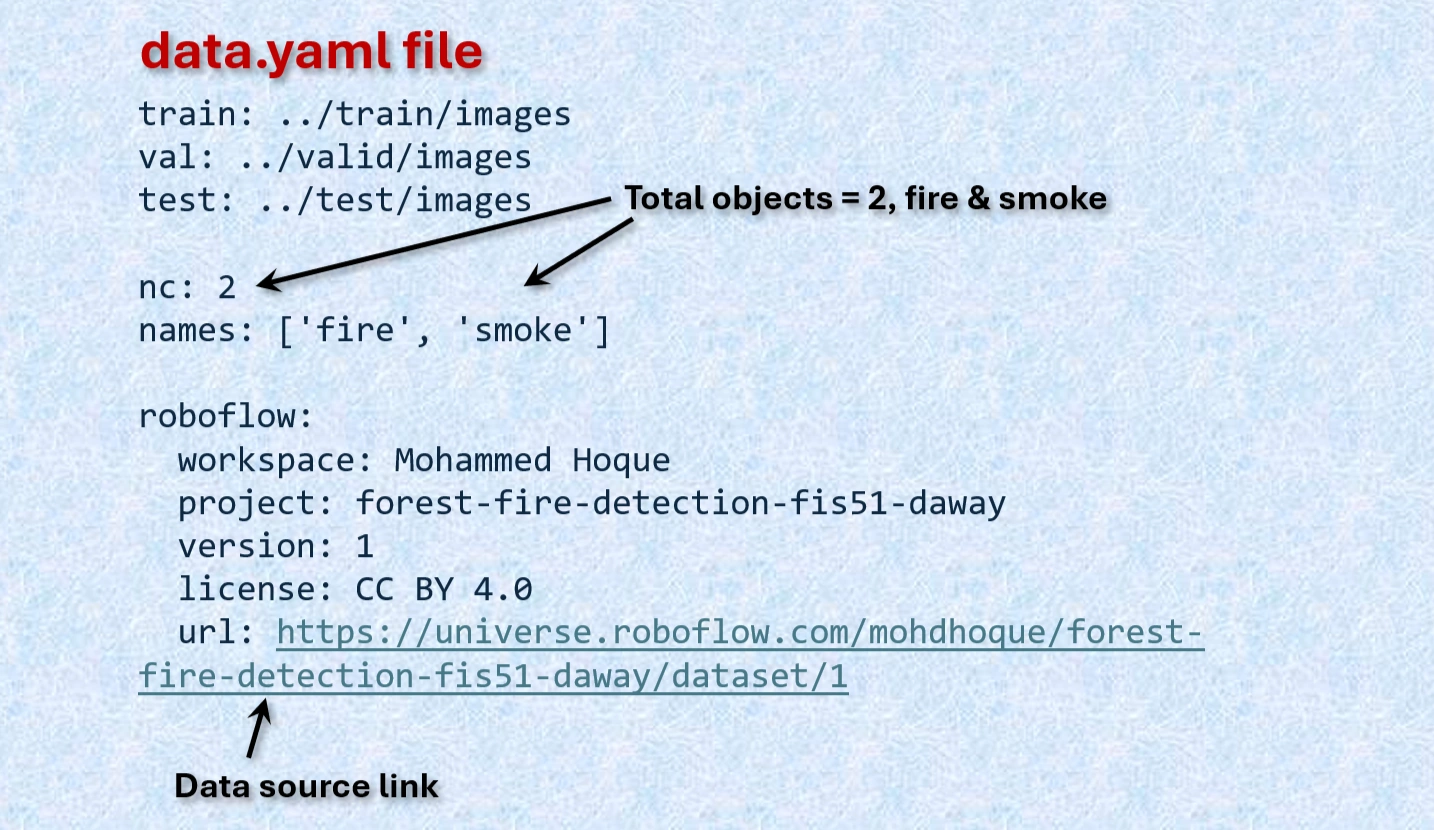
Contents of data.yaml file.
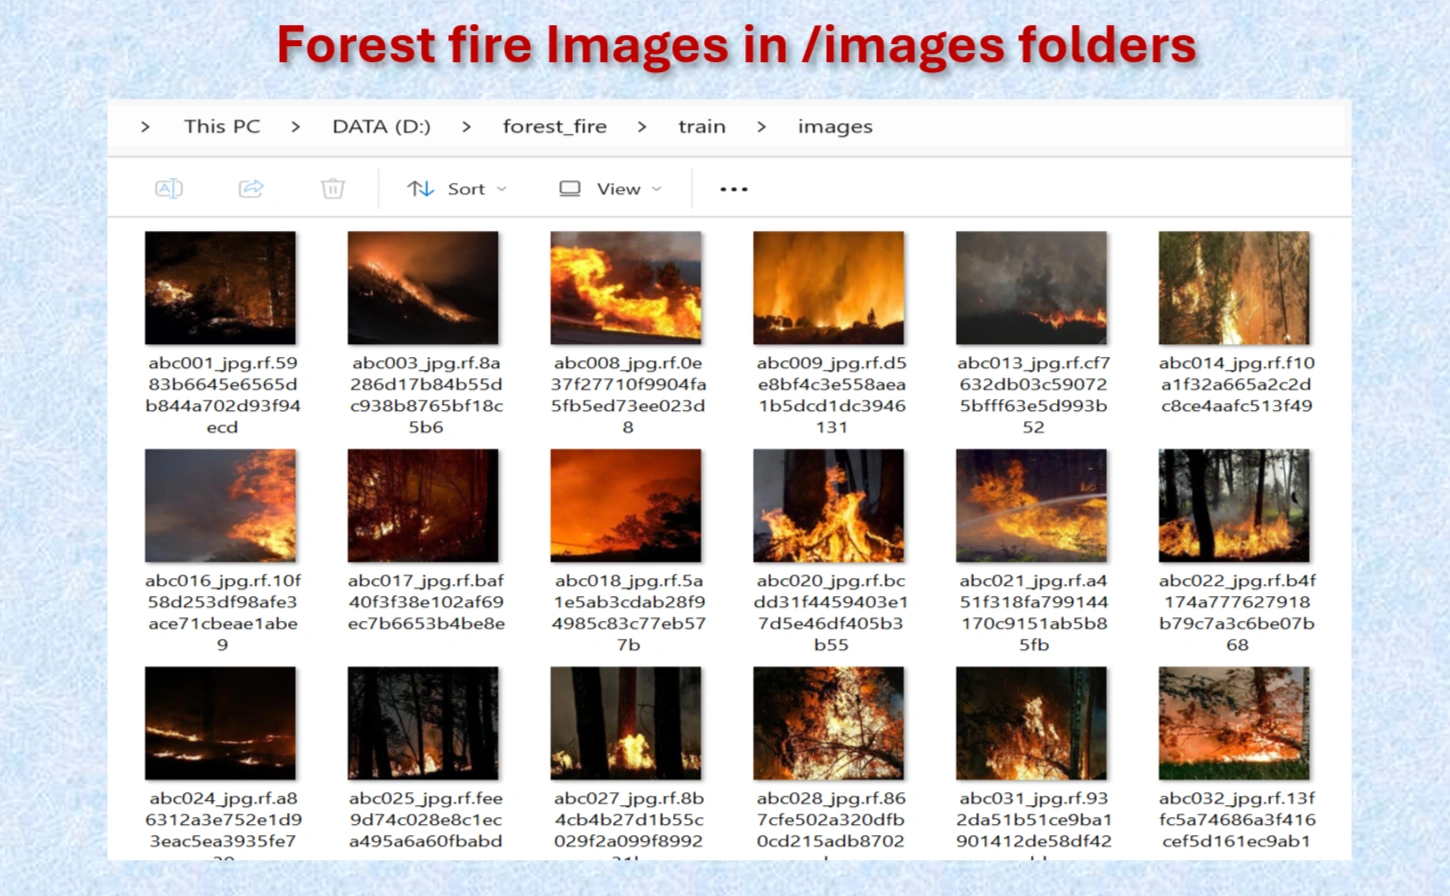
Downloaded images in images folders.
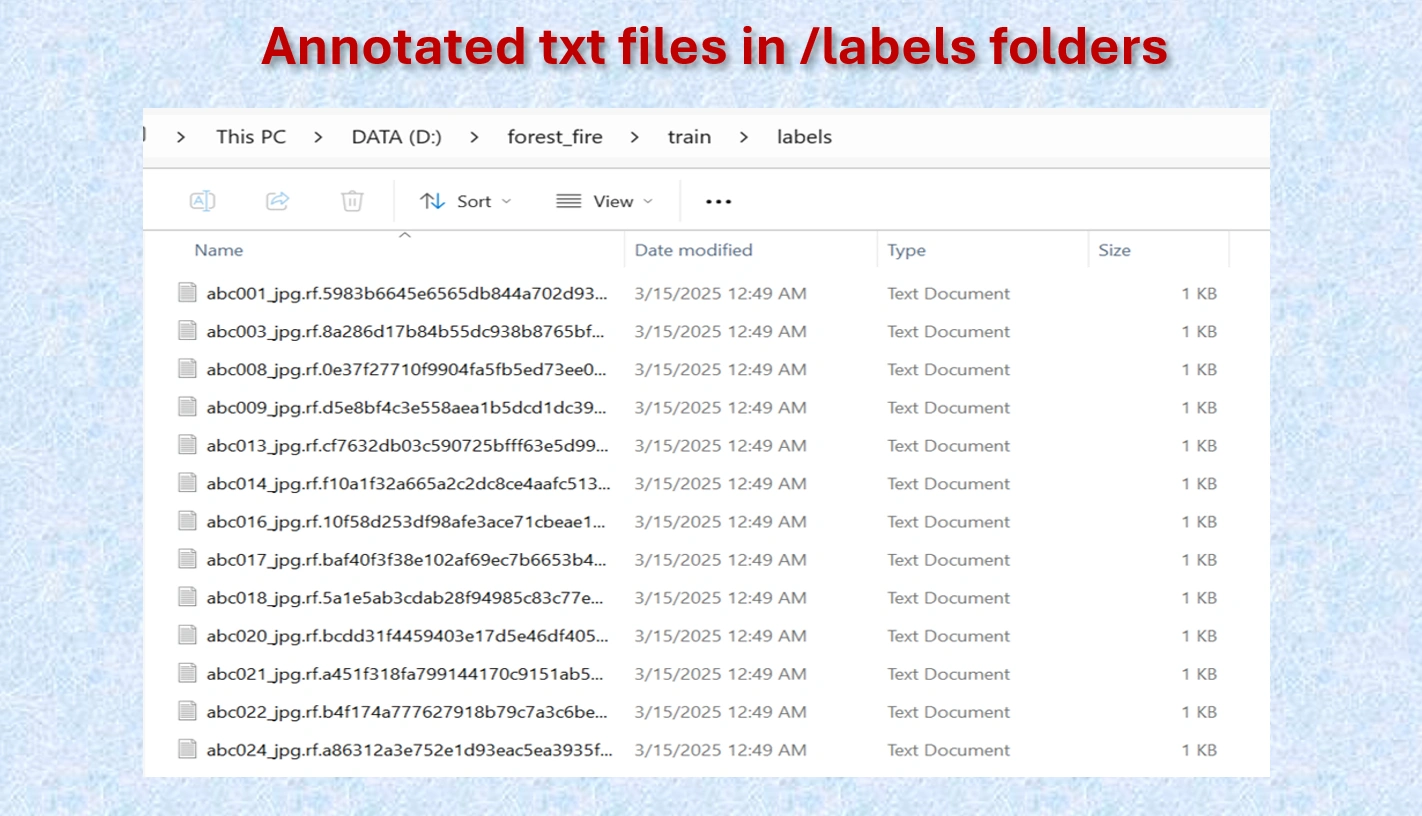
Annotated txt files for each image, with the same name of images.
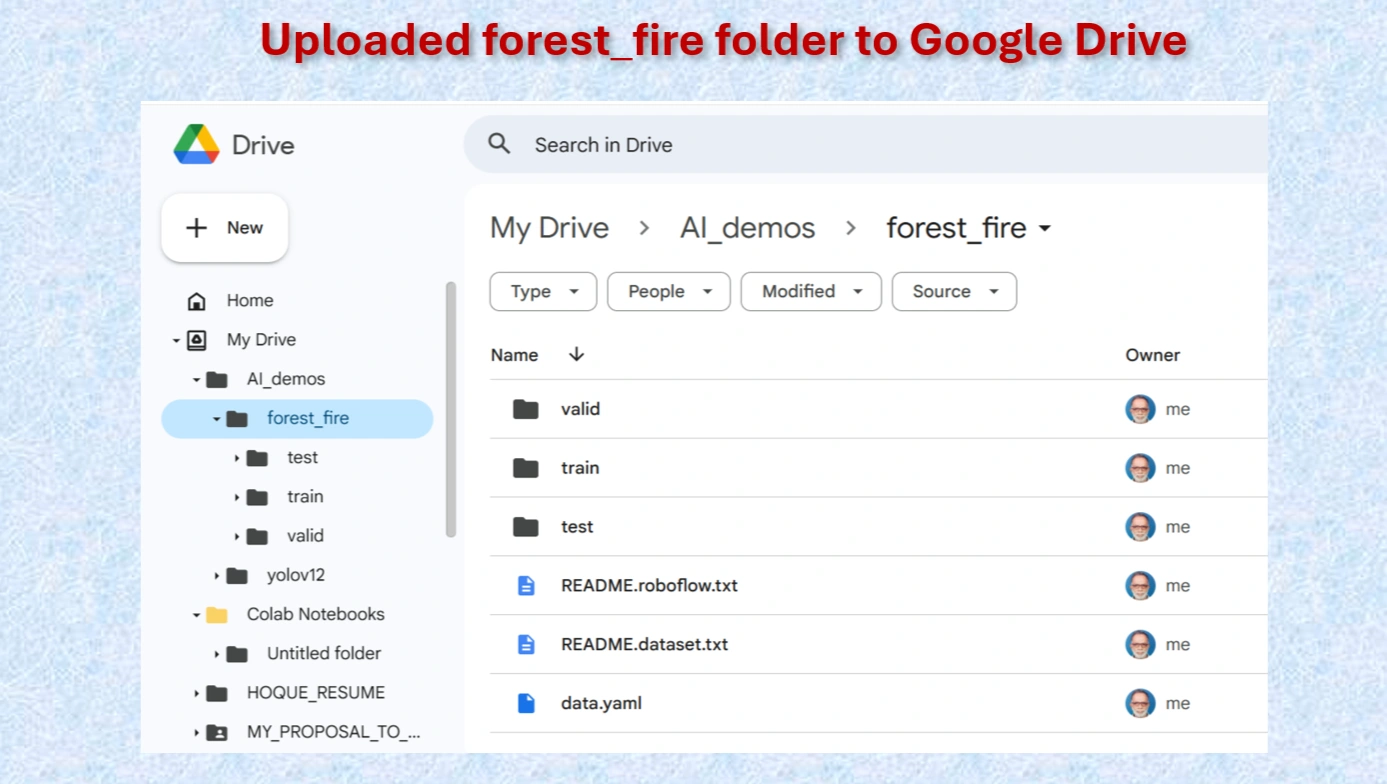
Uploaded forest_file folder.
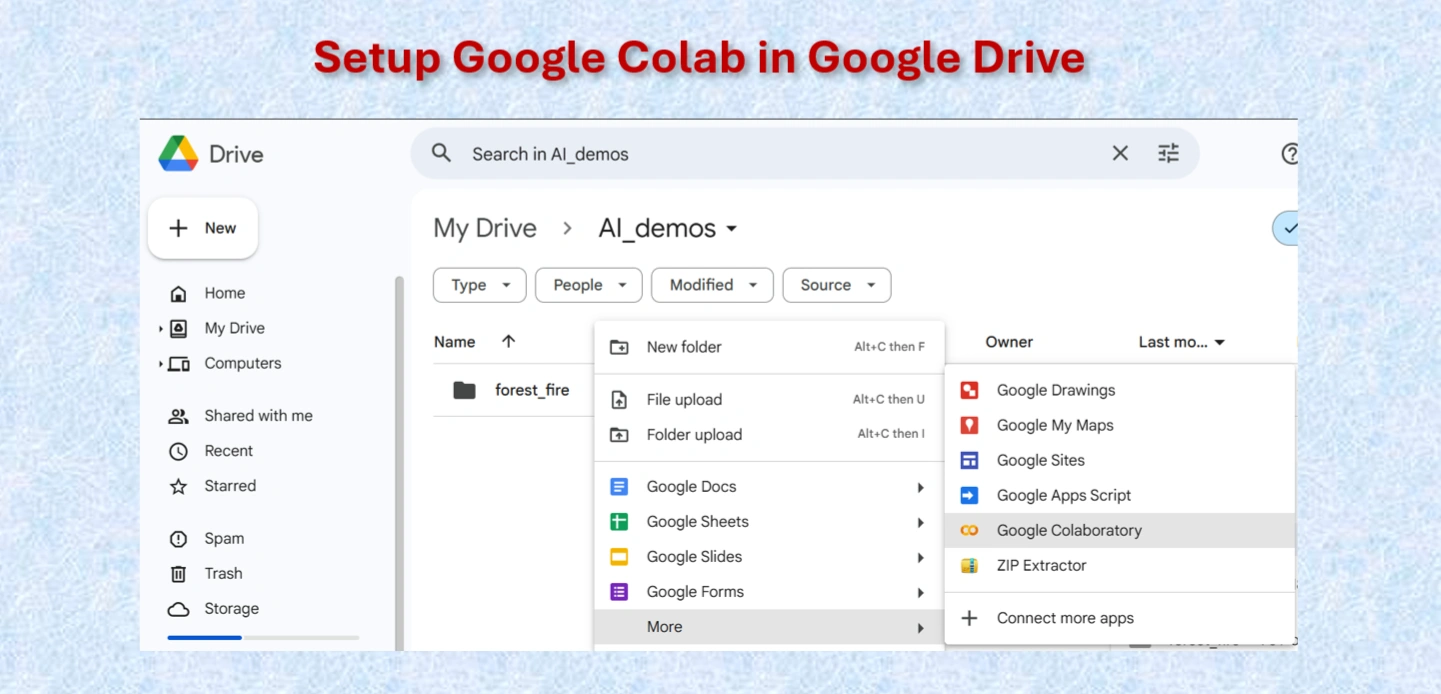
Setting up Google Colab.
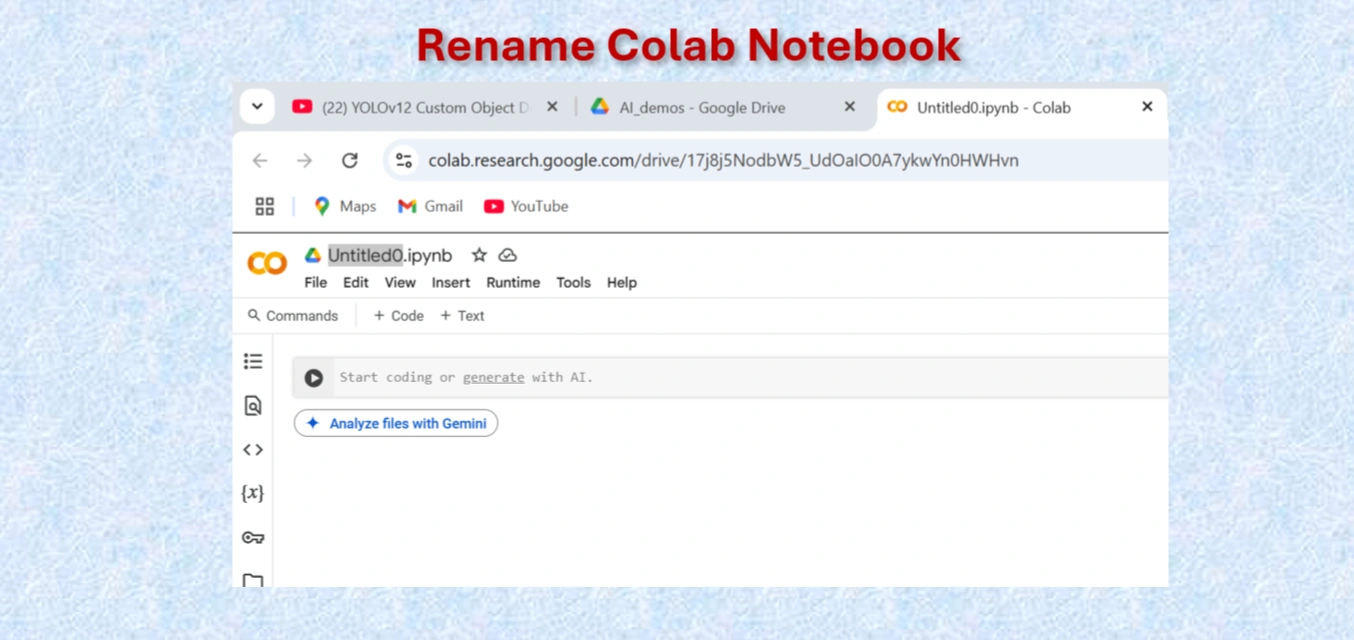
Rename Google Colab Notebook.

Rename Google Colab Notebook forest_fire.ipynb.
Google Colab offers free access to GPUs like the NVIDIA T4, which is a powerful hardware accelerator specifically designed for deep learning tasks. Using a GPU instead of a CPU can dramatically improve the speed and efficiency of your machine learning workflows.
Runtime → Change runtime type → GPU to connect a GPU in Colab.For deep learning projects, using a T4 GPU on Google Colab is a game-changer. It significantly reduces training time, improves model accuracy with larger datasets, and provides a seamless experience for machine learning experiments. While CPUs are suitable for small-scale tasks, they are inefficient for advanced AI projects.
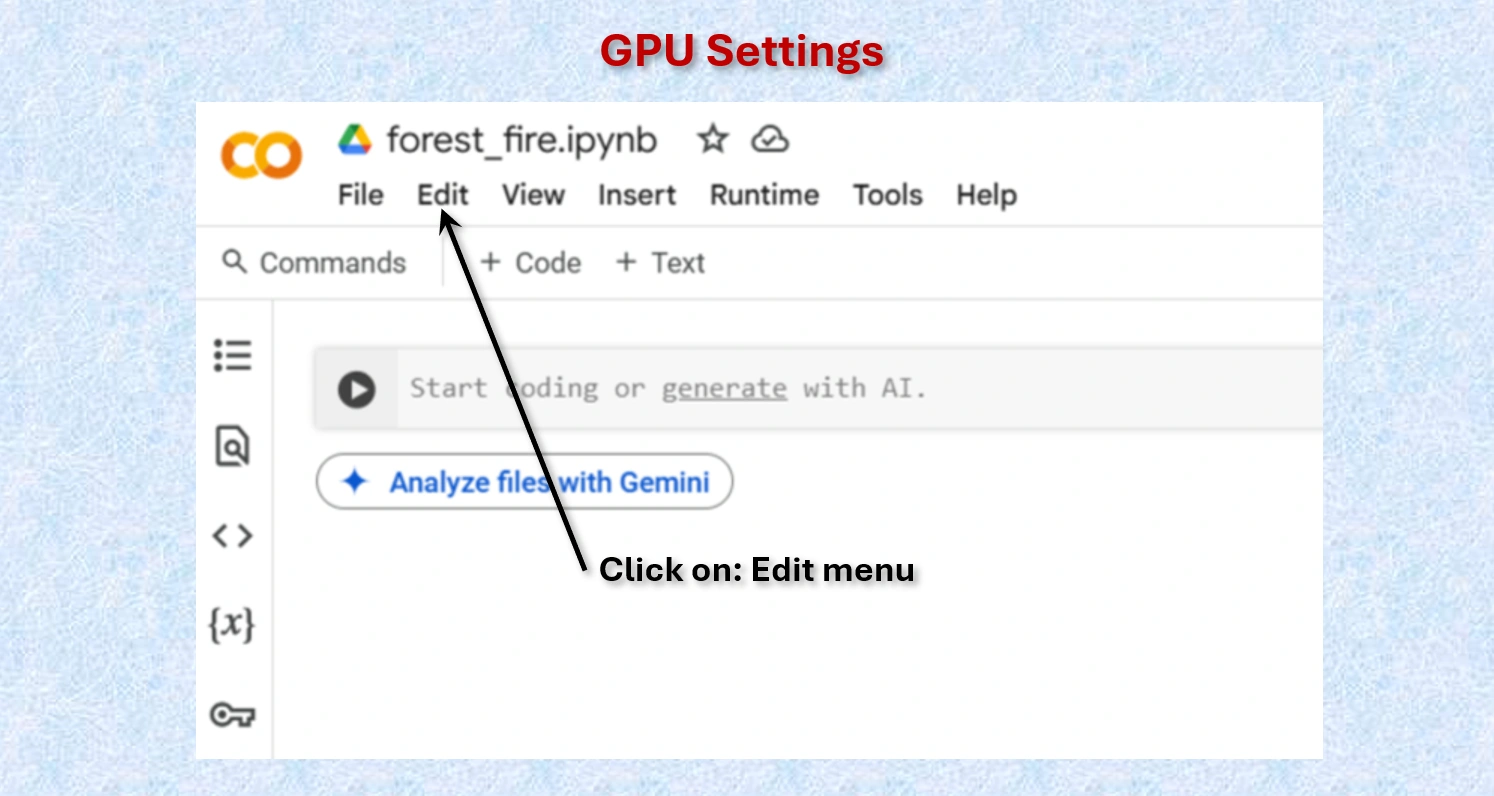
Click on Edit menu on Colab
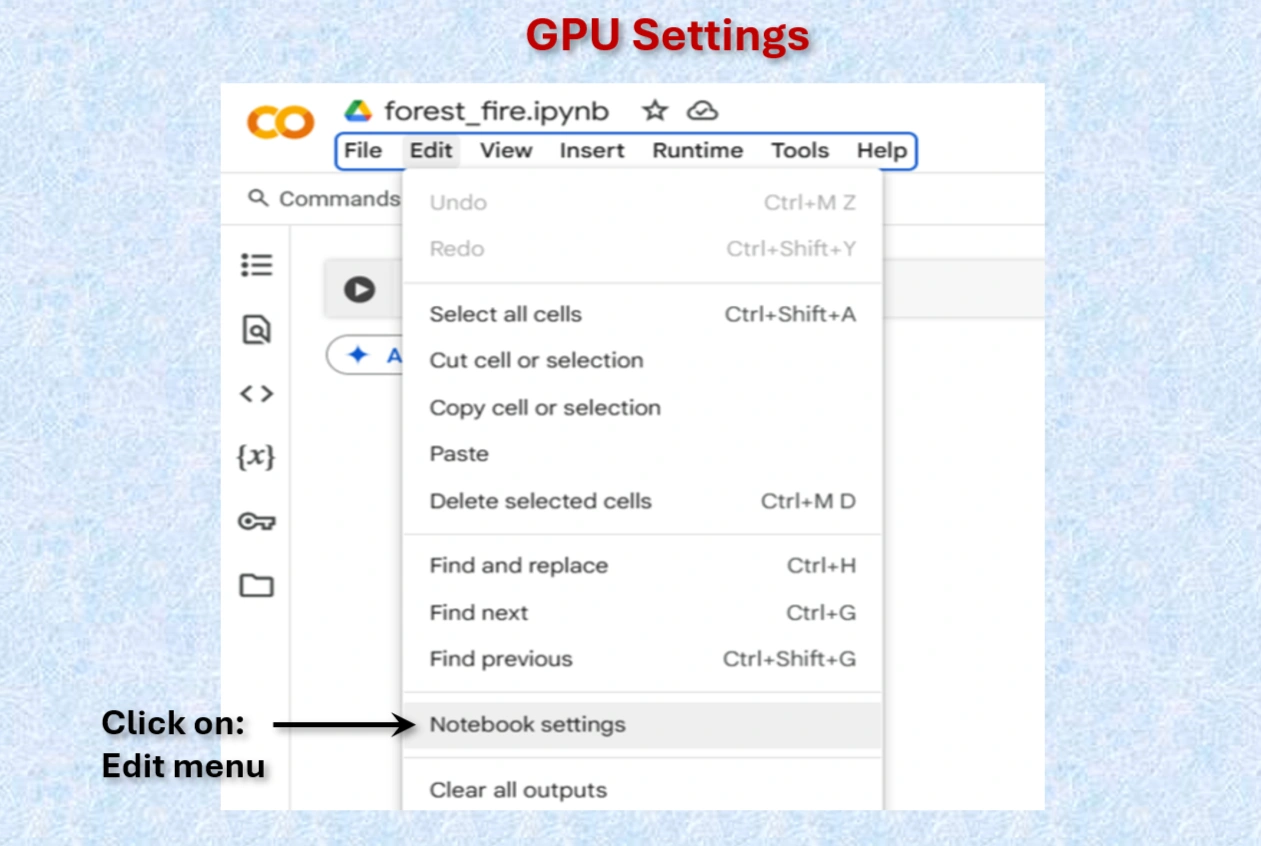
Click on Notebook setting on Colab
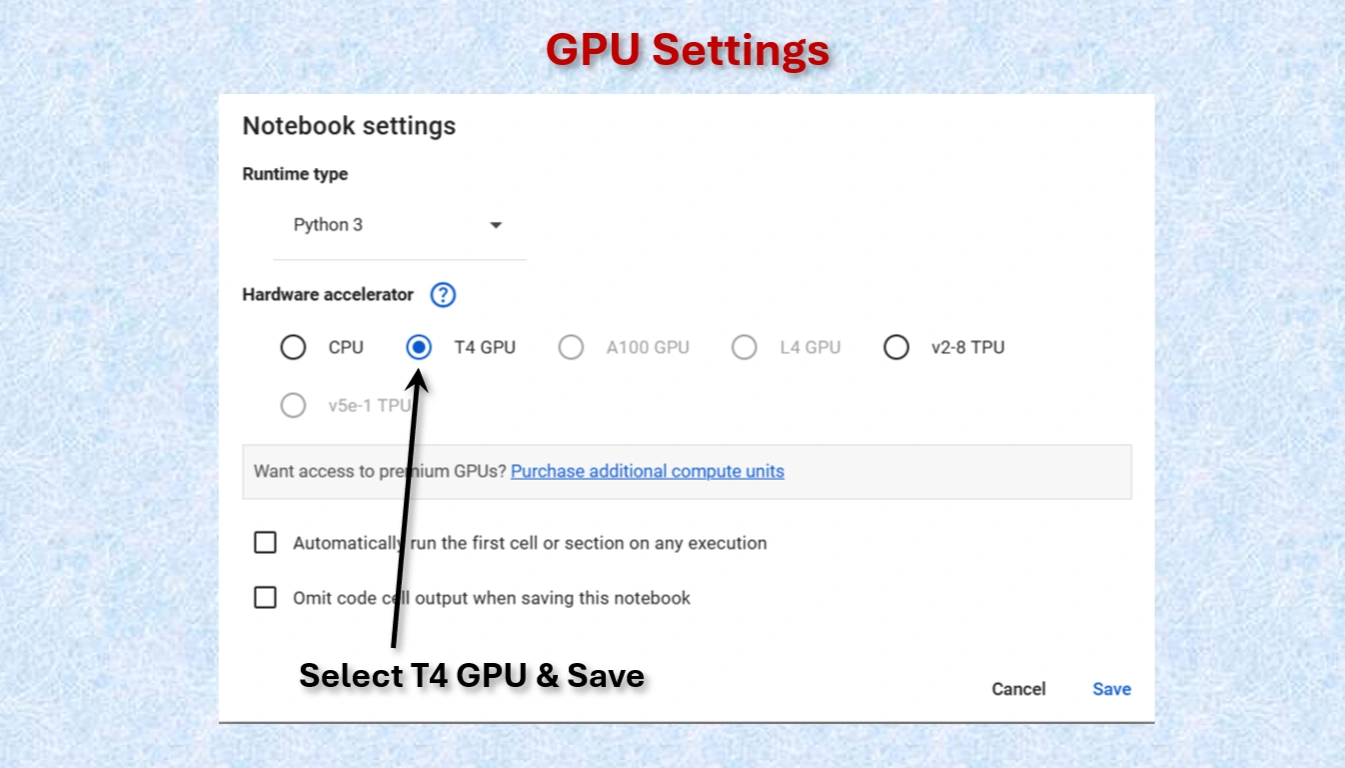
Select T4 GPU and save
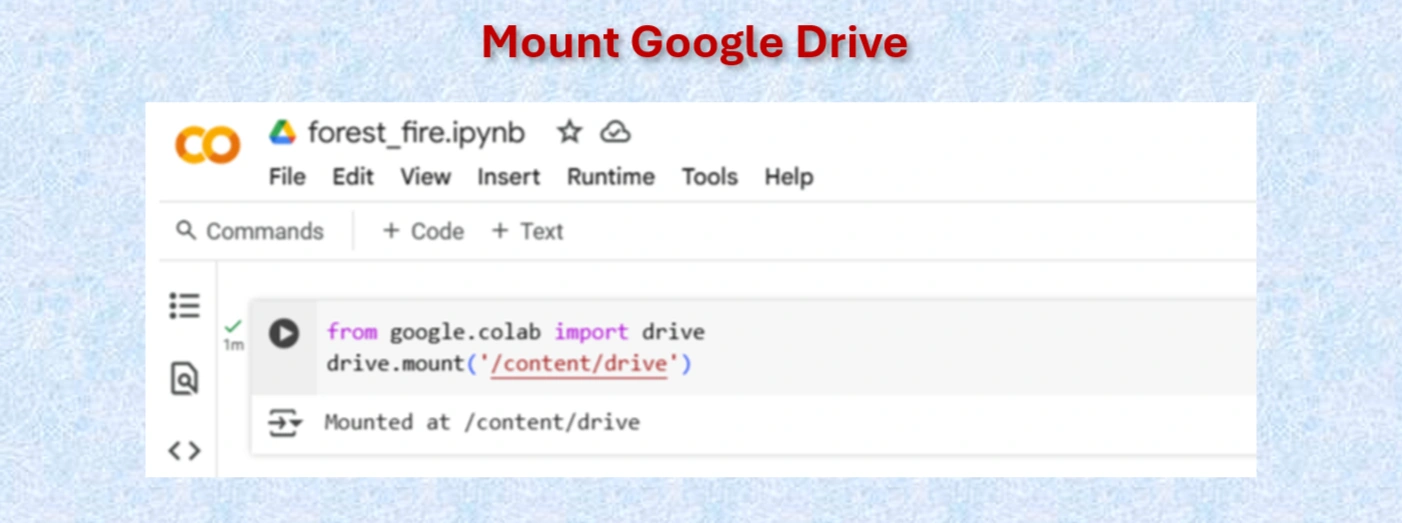
Mount Google drive
        Codes:

        from google.colab import drive
        drive.mount('/content/drive')
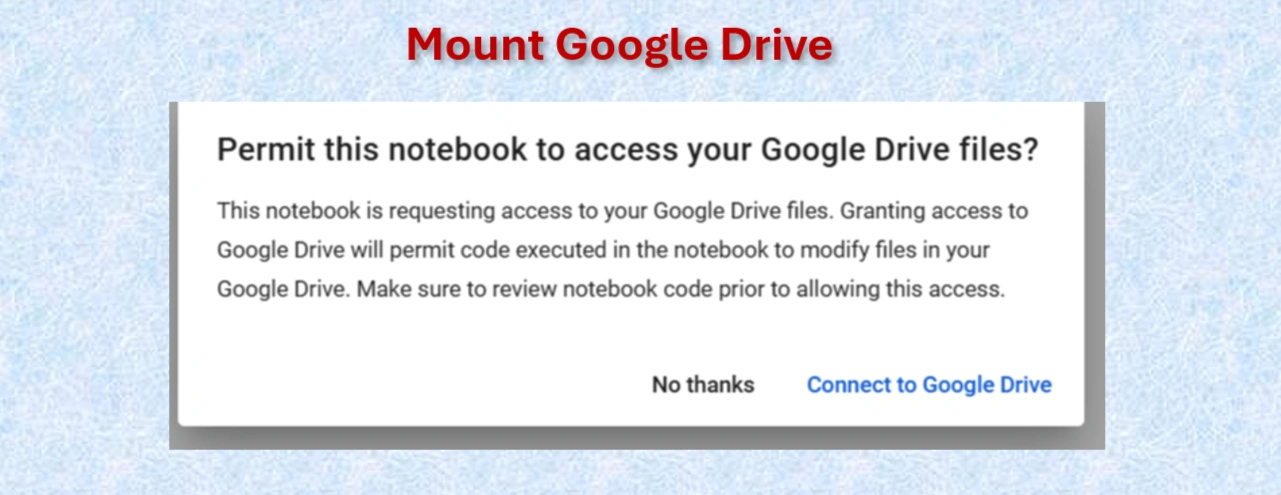
Mount Google drive
 "
"
Click on: connect to google drive
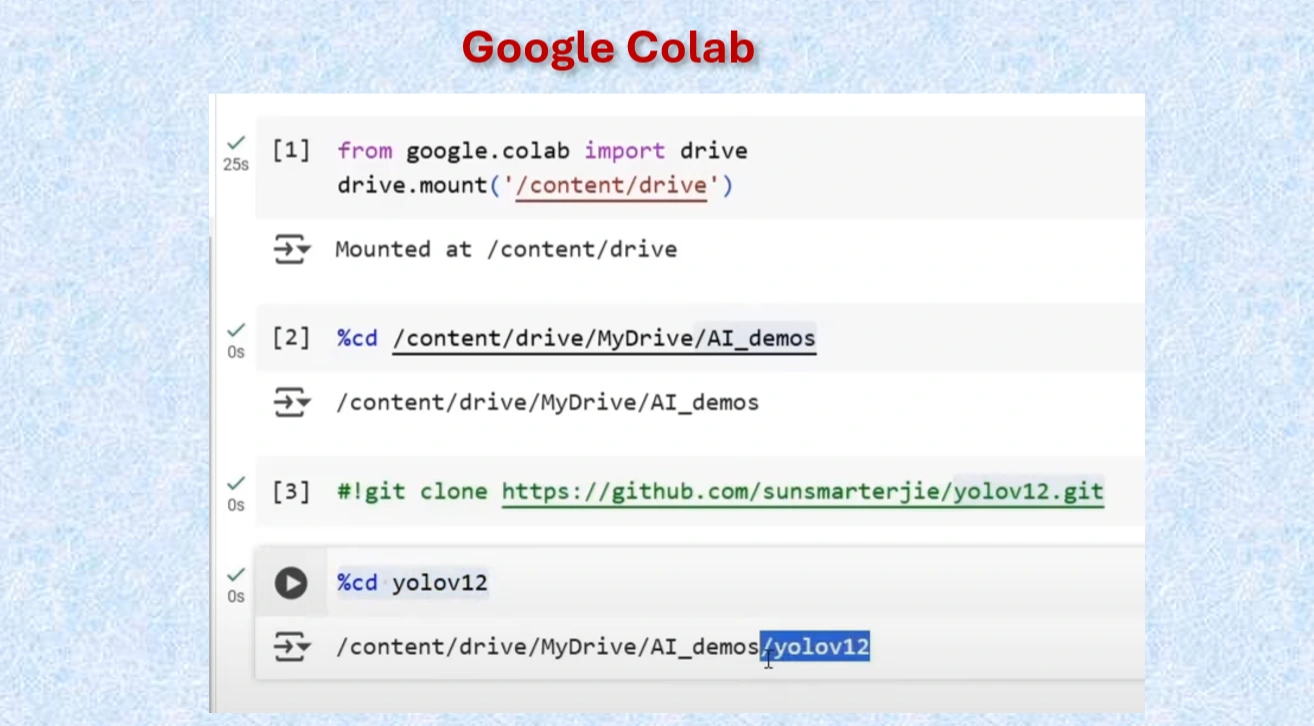
Codes in Google Colab Cells

Created yolov12 Folder
After mounting Google drive:
            Codes:

            #Mount Google drive to colab cell
            from google.colab import drive
            drive.mount('/content/drive')

            %cd /content/drive/MyDrive/AI_demos

            #Clone yolov12 Repo
            !git clone https://github.com/sunsmarterjie/yolov12.git

            #Go to newly created yolov12 folder
            %cd yolov12
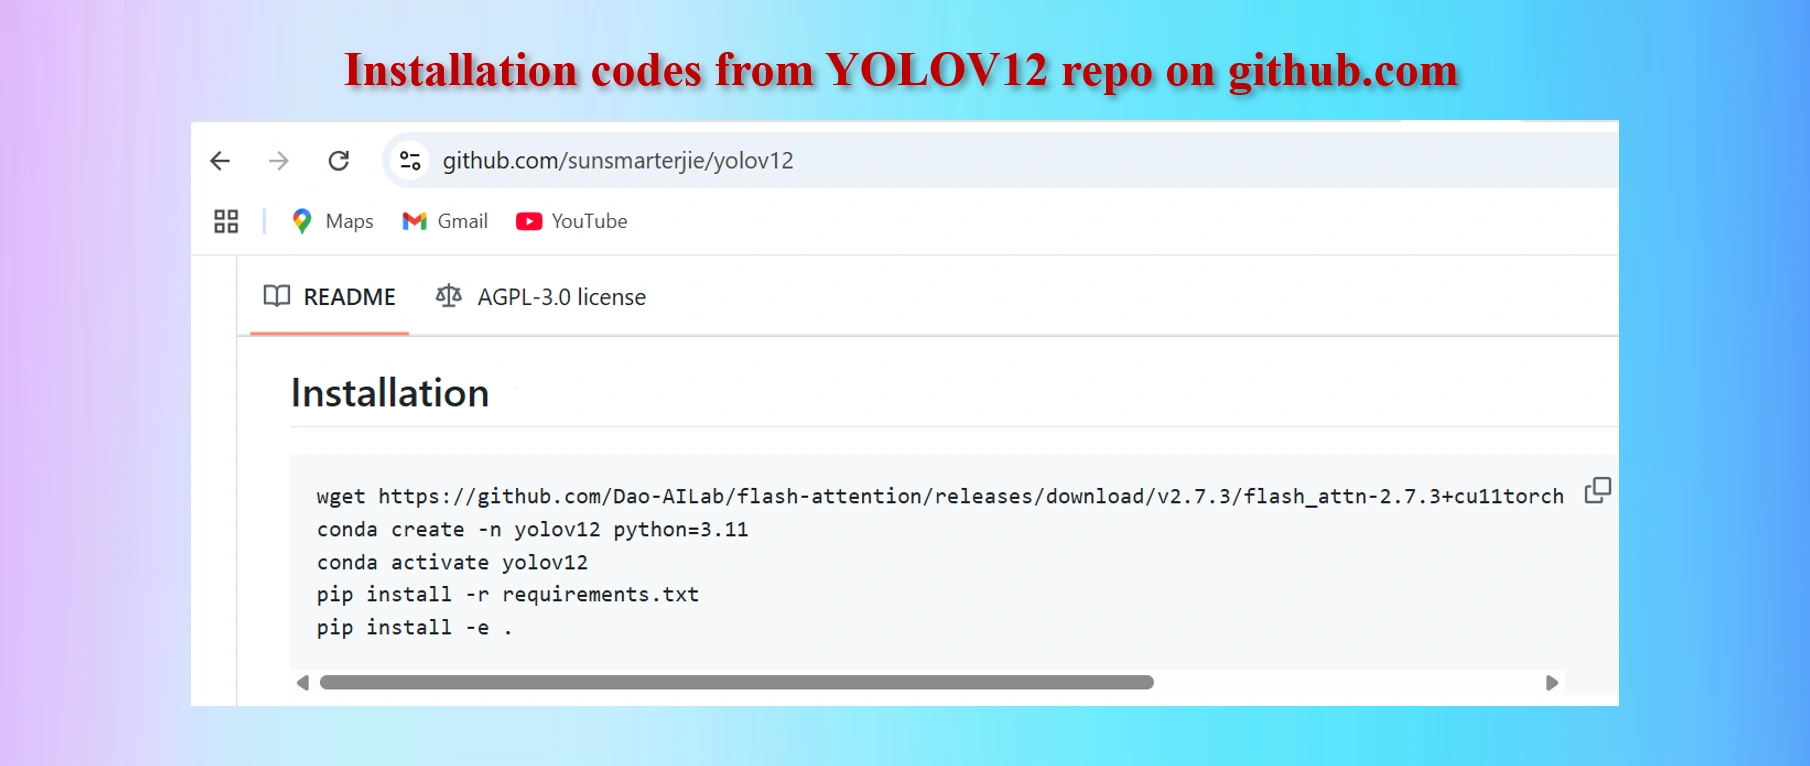
Copy codes from yolov12 github repo
            CODES:

            #Codes to install
            wget https://github.com/Dao-AILab/flash-attention/releases/download/v2.7.3/flash_attn-2.7.3+cu11torch2.2cxx11abiFALSE-cp311-cp311-linux_x86_64.whl

            conda create -n yolov12 python=3.11

            conda activate yolov12

            !pip install -r requirements.txt

            !pip install -e .
We shall have to install lines 1, 4 and 5 above in Colab Notebook cells. However, as we are worlikg in Google Colab environments in Google drive, codes in lines 2 and 3 are not needed. These two lines of codes are needed if we work in a local computer in a separate environment.
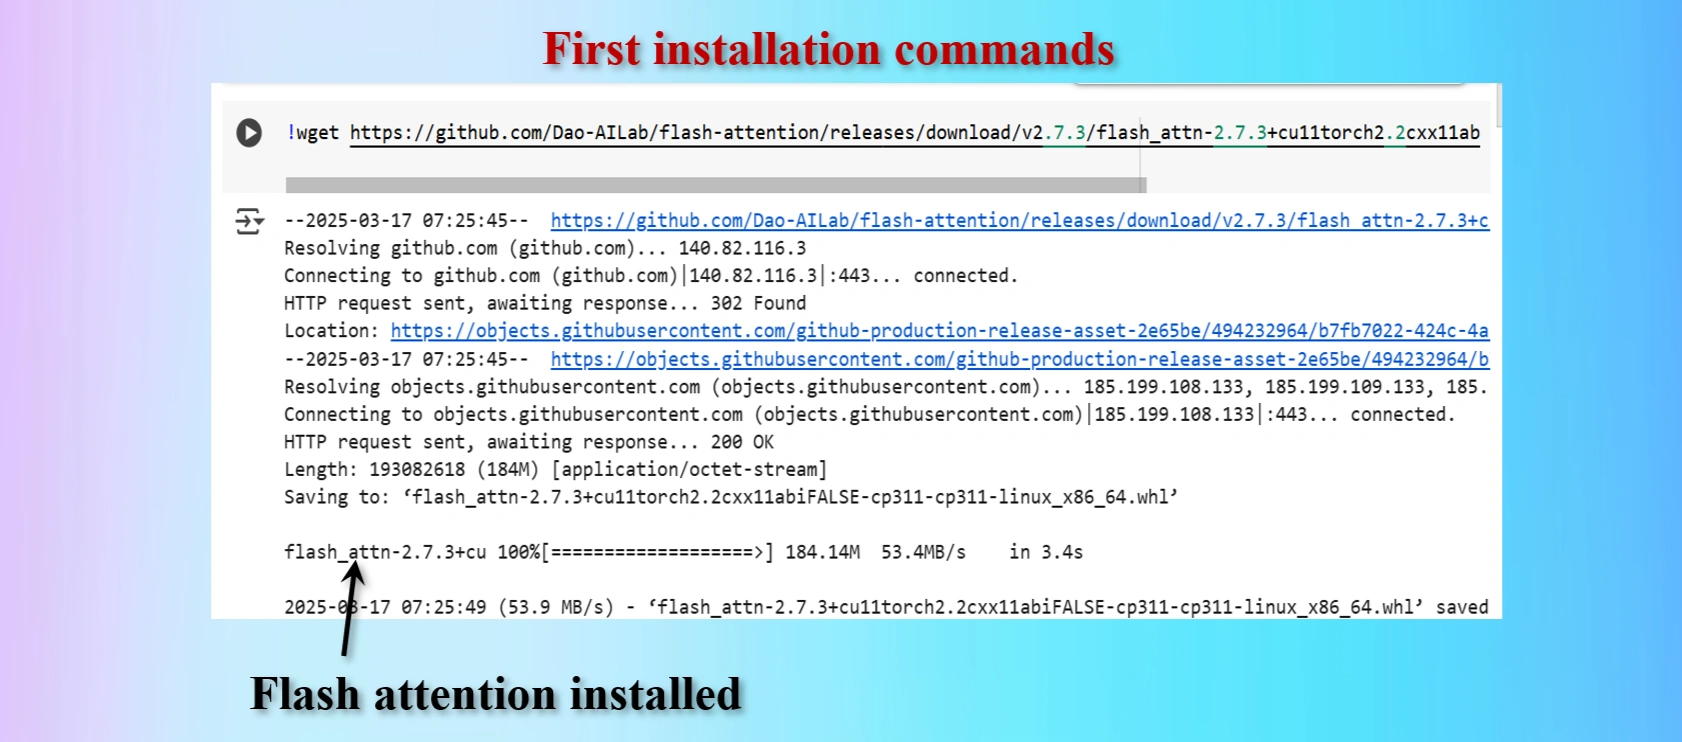
Installed first command copying from yolov12 repo
Displays that Flash_Attention installed
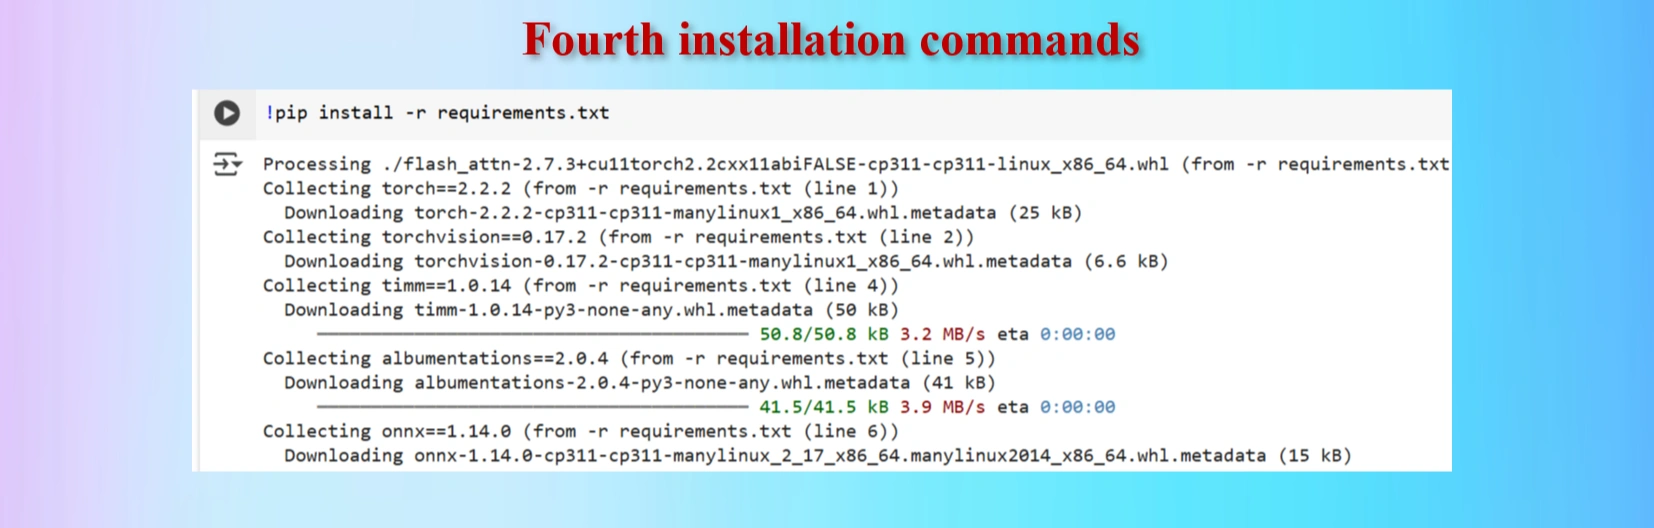
Installed fourth command copying from yolov12 repo
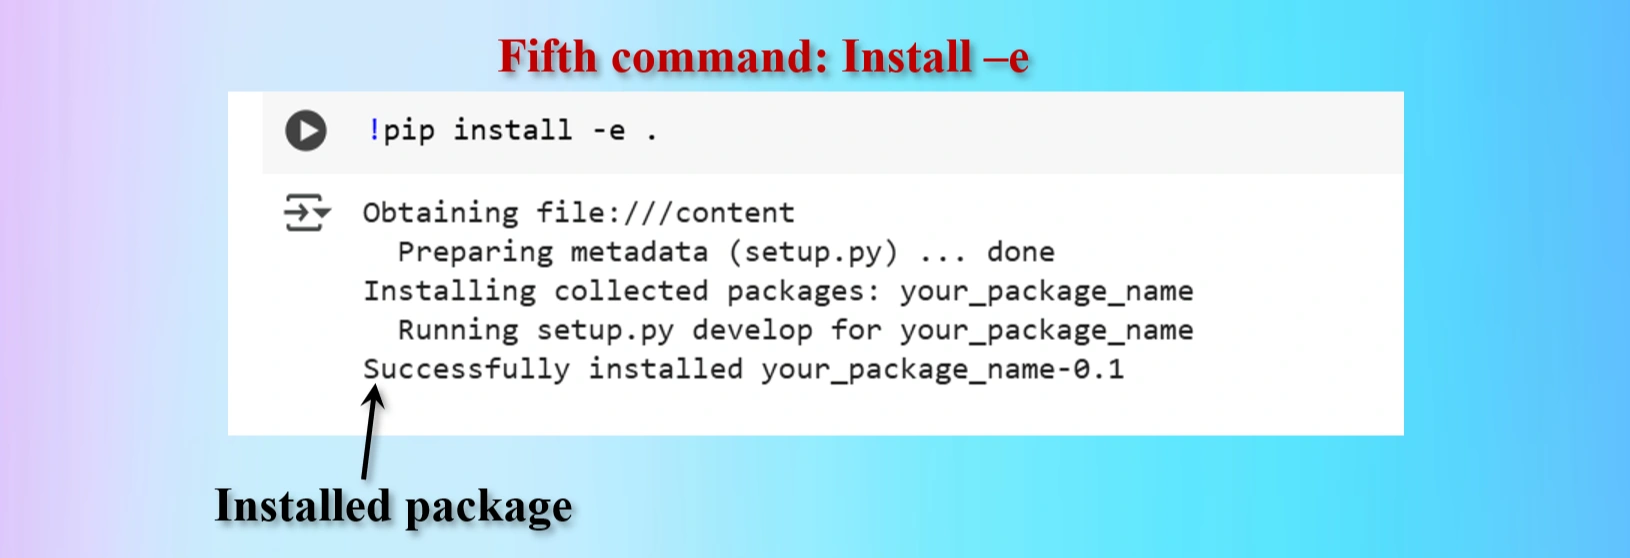
Installed fifth command copying from yolov12 repo
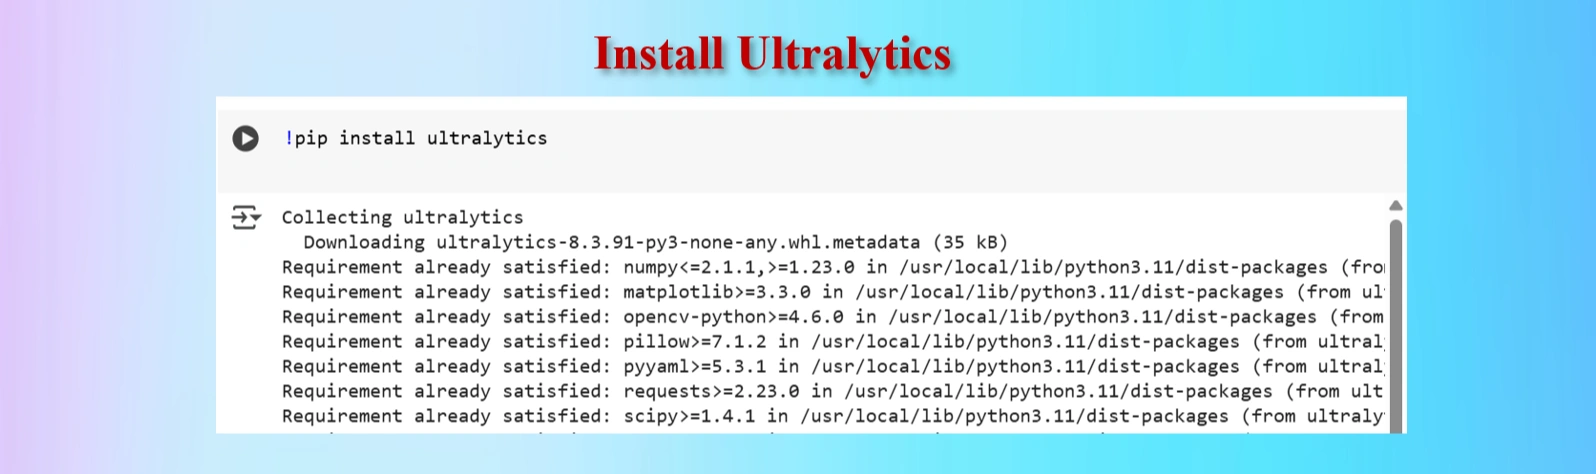
Installed Ultralytics
            CODES:

            #Ultralytics installation
            !pip install ultralytics
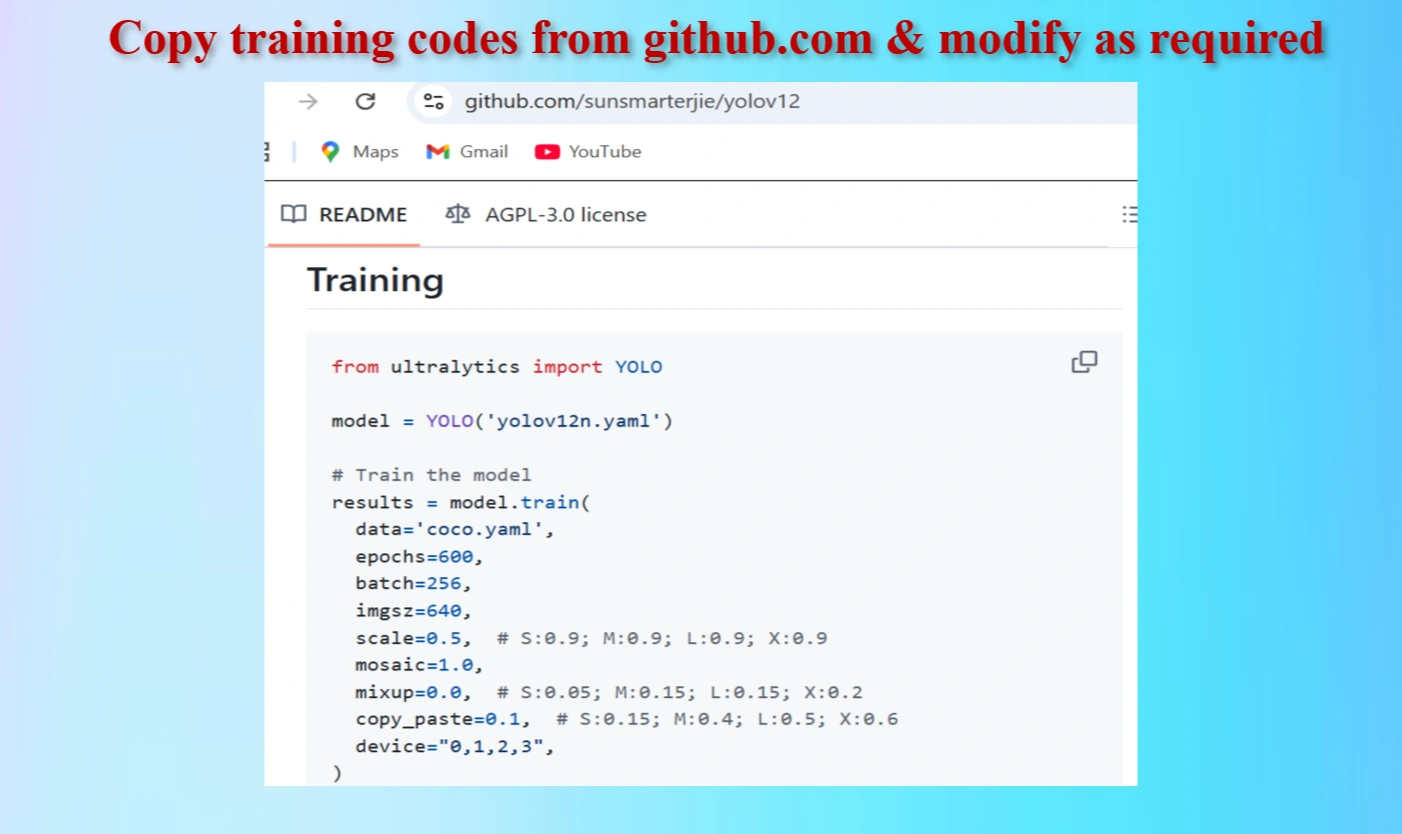
Copied Training Codes & Modify as our requirements
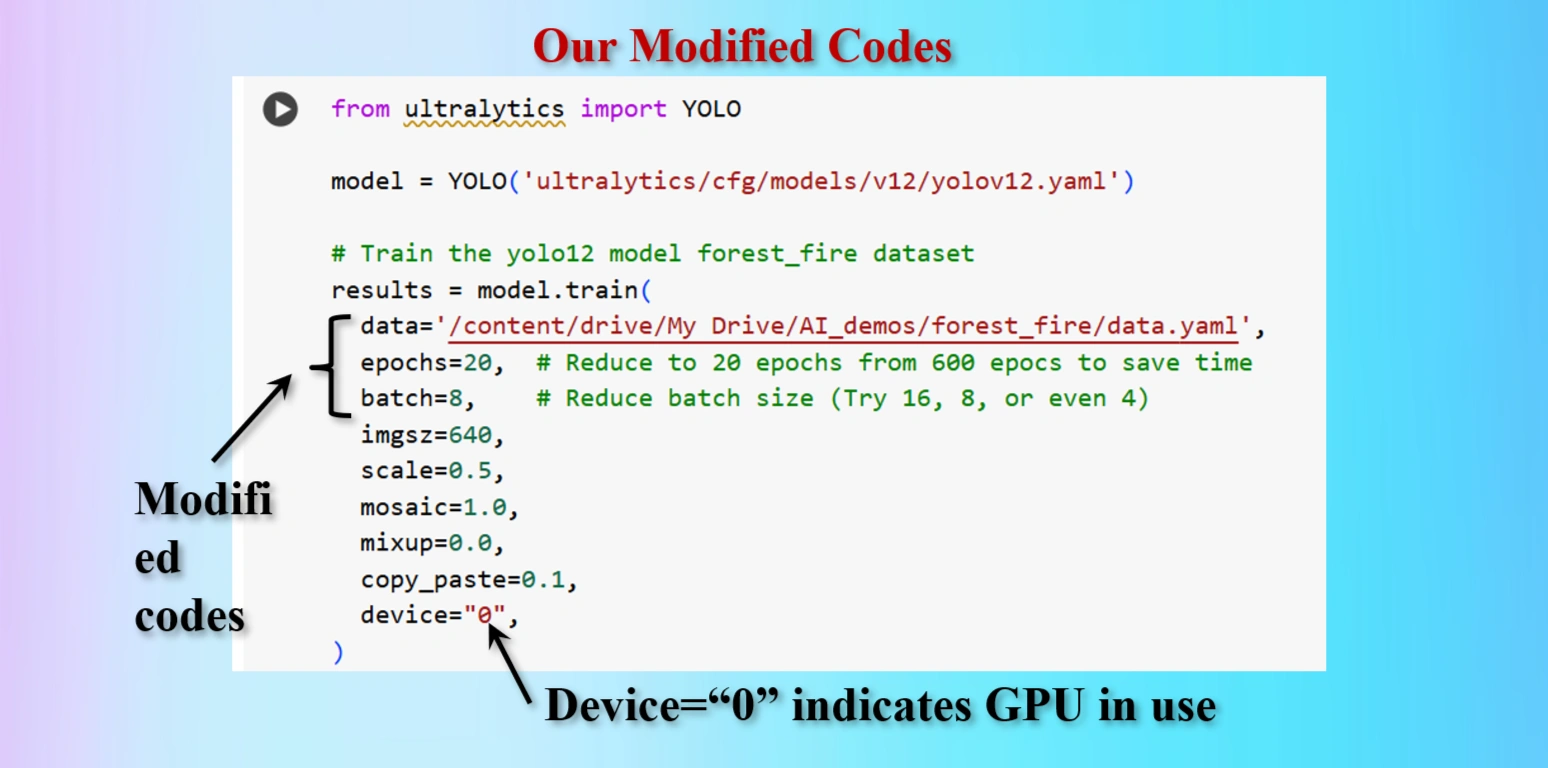
Modified Training codes as per our requirements
We have modifed the codes as below:
        OUR MODIFIED CODES:

        from ultralytics import YOLO

        model = YOLO('ultralytics/cfg/models/v12/yolov12.yaml')

        # Train the yolo12 model forest_fire dataset
        results = model.train(
        data='/content/drive/My Drive/AI_demos/forest_fire/data.yaml',
        epochs=20,  # Reduce to 20 epochs from 600 epocs to save time
        batch=8,    # Reduce batch size (Try 16, 8, or even 4)
        imgsz=640,
        scale=0.5,
        mosaic=1.0,
        mixup=0.0,
        copy_paste=0.1,
        device="0",
        )
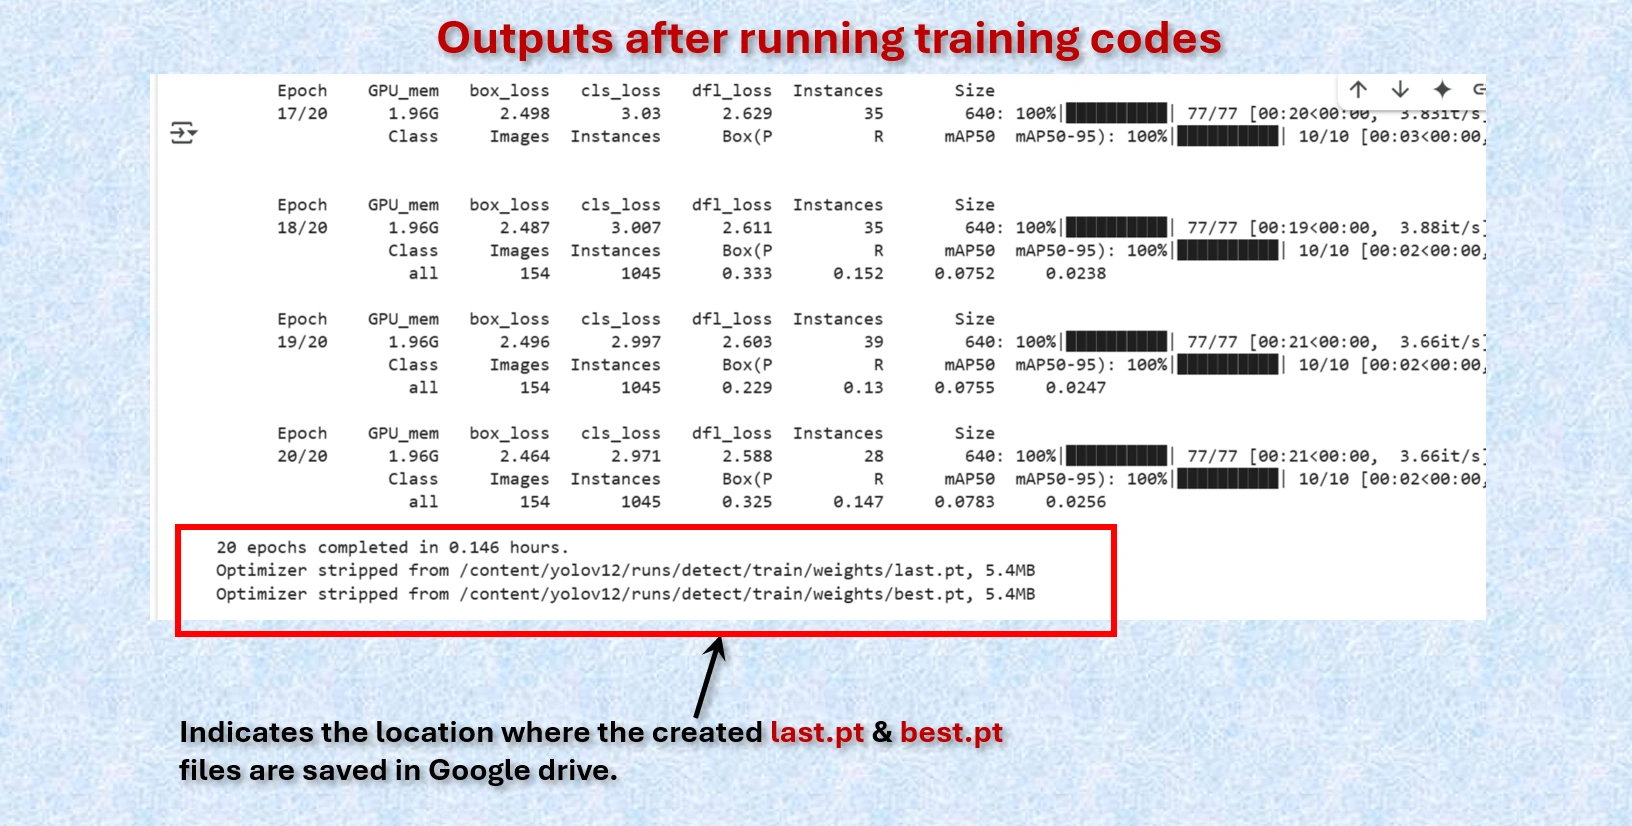
Display shows the locations of created last.pt & best.pt files that are saved.
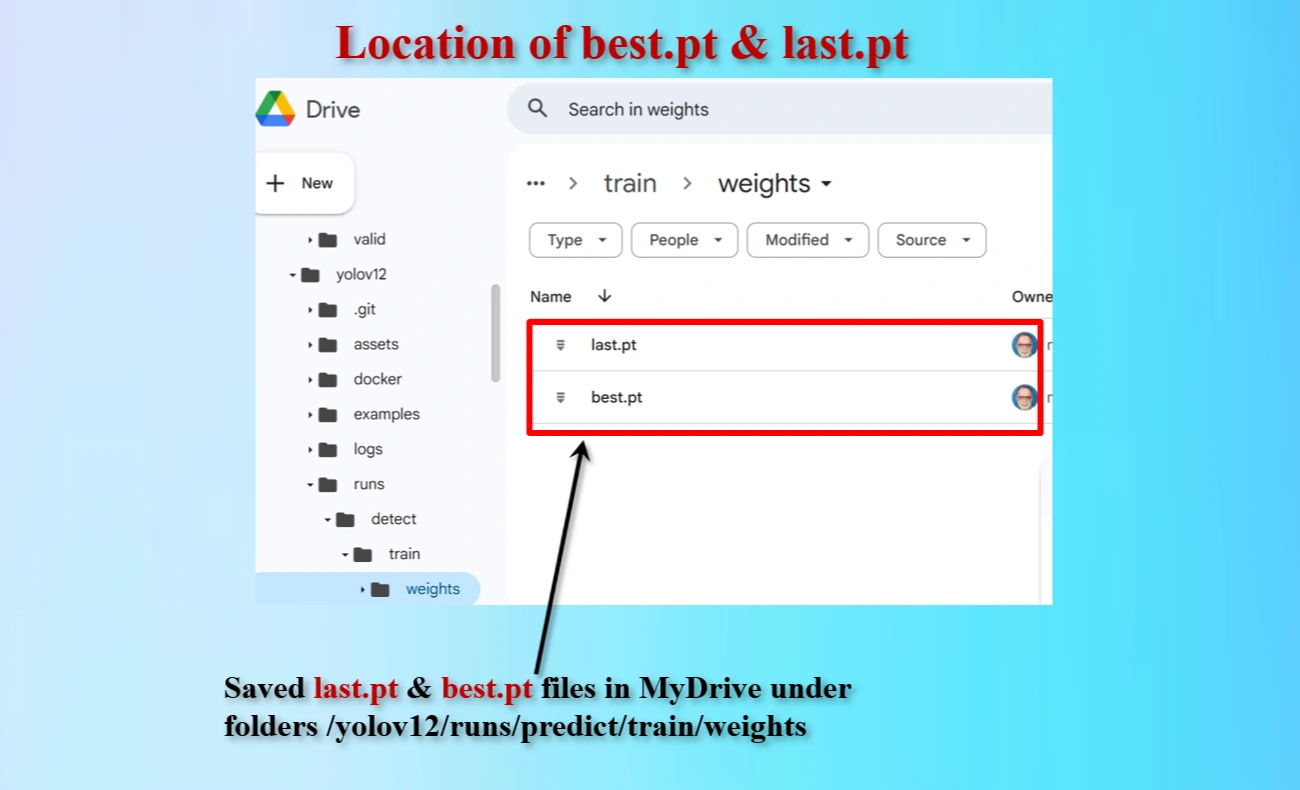
Directory locations of created last.pt & best.pt files that are saved.

Test the model to detect fire on image.
        CODES:

        from ultralytics import YOLO

        # Load the trained YOLO model using the correct path
        model_path = '/content/yolov12/runs/detect/train/weights/best.pt'
        print("File exists:", os.path.exists(model_path))

        # Load the model and run inference
        if os.path.exists(model_path):
            model = YOLO(model_path)
            results = model('/content/drive/MyDrive/AI_demos/fire1.png')
            results[0].show()
        else:
            print("Model file not found!")

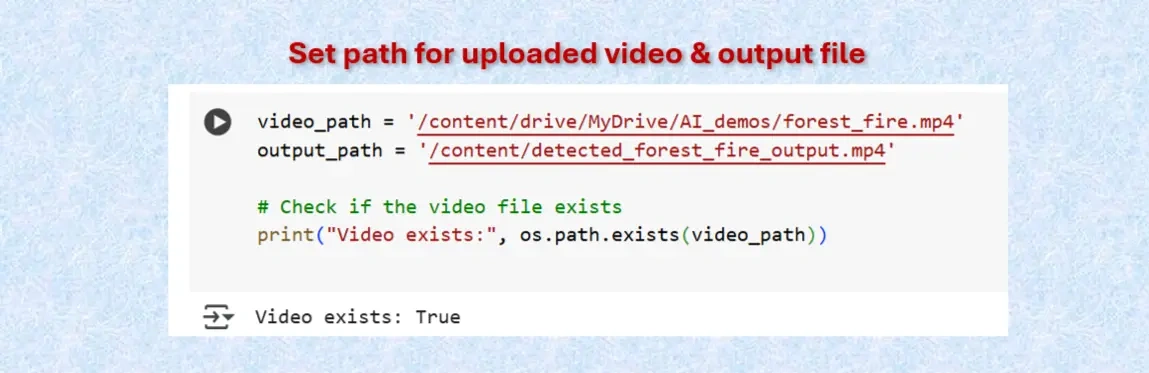
Set paths for uploaded video & fire detected video.
        CODES:

        video_path = '/content/drive/MyDrive/AI_demos/forest_fire.mp4'
        output_path = '/content/detected_forest_fire_output.mp4'

        # Check if the video file exists
        print("Video exists:", os.path.exists(video_path))
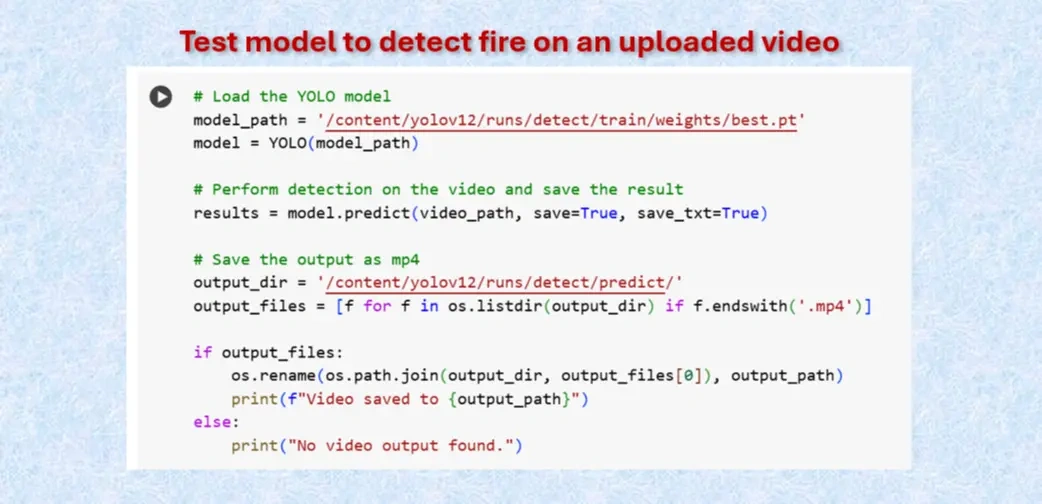
Test the model to detect fire on uploaded video.
        CODES:

        # Load the YOLO model
        model_path = '/content/yolov12/runs/detect/train/weights/best.pt'
        model = YOLO(model_path)

        # Perform detection on the video and save the result
        results = model.predict(video_path, save=True, save_txt=True)

        # Save the output as mp4
        output_dir = '/content/yolov12/runs/detect/predict/'
        output_files = [f for f in os.listdir(output_dir) if f.endswith('.mp4')]

        if output_files:
            os.rename(os.path.join(output_dir, output_files[0]), output_path)
            print(f"Video saved to {output_path}")
        else:
            print("No video output found.")

Test the model to detect fire on uploaded video.
Actually, fire detected video was saved as avi format as "forest_fire.avi". Downloaded the video converted it to "forest_fire.webm" format and run to check how fire are detected by the yolo model as shown below:
Detected Forest fire on a video. NOTE: To test our program to detect fire, we have taken a part of the video
from "Forest Fire Threatens Homes In Carolina Forest" by the curtsey of
The Myrtle Beach Sun News.
VIDEO: Click on play arrow icon to run the video.
Using an online GPU, after training the YOLOv12 model with a custom dataset, it successfully detected forest fires but failed to identify smoke. This limitation is primarily due to insufficient training. While it was recommended to run the training for 600 epochs for optimal performance, we completed only 20 epochs to reduce training time. The process took approximately 0.146 hours. Based on this, running the full 600 epochs would require an estimated 4.5 to 5 hours.
However, without a GPU, using a normal CPU would significantly increase the training time. It would take about 5.5 hours to run 20 epochs. Therefore, completing 600 epochs would take approximately 165 hours, equivalent to about 7 days.
